

作者:子弈
轉(zhuǎn)發(fā)鏈接:https://juejin.im/post/6856410900577026061
目錄
從零開始配置 TypeScript 項目的教程(一)
從零開始配置 TypeScript 項目的教程(二) 本篇
Jest 確保構(gòu)建
單獨通過執(zhí)行Unpm run test 命令進行單元測試,這里演示執(zhí)行構(gòu)建命令時的單元測試(需要保證構(gòu)建之前所有的單元測試用例都能通過)。如果測試失敗,那么應(yīng)該防止繼續(xù)構(gòu)建,例如進行失敗的構(gòu)建行為:
PS C:CodeGitalgorithms> npm run build

> [email protected] build C:CodeGitalgorithms
> npm run lint-strict && npm run jest && rimraf dist types && gulp


> [email protected] lint-strict C:CodeGitalgorithms
> eslint src --max-warnings 0


> [email protected] jest C:CodeGitalgorithms
> jest --coverage

 PASS  dist/test/greet.spec.js
 FAIL  test/greet.spec.ts
  ● src/greet.ts › name param test

    expect(received).toBe(expected) // Object.is equality

    Expected: "Hello from world 1"
    Received: "Hello from world"

      3 | describe("src/greet.ts", () => {
      4 |   it("name param test", () => {
    > 5 |     expect(greet("world")).toBe("Hello from world 1");
        |                            ^
      6 |   });
      7 | });
      8 |

      at Object.<anonymous> (test/greet.spec.ts:5:28)

----------|---------|----------|---------|---------|-------------------
| File       | % Stmts   | % Branch   | % Funcs   | % Lines   | Uncovered Line #s   |
| ---------- | --------- | ---------- | --------- | --------- | ------------------- |
| All files  | 100       | 100        | 100       | 100       |
| greet.ts   | 100       | 100        | 100       | 100       |
| ---------- | --------- | ---------- | --------- | --------- | ------------------- |
Test Suites: 1 failed, 1 passed, 2 total
Tests:       1 failed, 1 passed, 2 total
Snapshots:   0 total
Time:        3.45 s
Ran all test suites.
npm ERR! code ELIFECYCLE
npm ERR! errno 1
npm ERR! [email protected] jest: `jest --coverage`
npm ERR! Exit status 1
npm ERR!
npm ERR! Failed at the [email protected] jest script.
npm ERR! This is probably not a problem with npm. There is likely additional logging output above.

npm ERR! A complete log of this run can be found in:
npm ERR!     C:Users子弈AppDataRoamingnpm-cache_logs2020-07-12T13_42_11_628Z-debug.log
npm ERR! code ELIFECYCLE
npm ERR! errno 1
npm ERR! [email protected] build: `npm run lint-strict && npm run jest && rimraf dist types && gulp`
npm ERR! Exit status 1
npm ERR!
npm ERR! Failed at the [email protected] build script.
npm ERR! This is probably not a problem with npm. There is likely additional logging output above.

npm ERR! A complete log of this run can be found in:
npm ERR!     C:Users子弈AppDataRoamingnpm-cache_logs2020-07-12T13_42_11_673Z-debug.log
需要注意由于是并行(&&)執(zhí)行腳本,因此執(zhí)行構(gòu)建命令時(npm run build)會先執(zhí)行 ESLint 校驗,如果 ESLint 校驗失敗那么退出構(gòu)建,否則繼續(xù)進行 Jest 單元測試。如果單元測試失敗那么退出構(gòu)建,只有當兩者都通過時才會進行源碼構(gòu)建。
Jest 確保代碼上傳
除了預(yù)防不負責任的代碼構(gòu)建以外,還需要預(yù)防不負責任的代碼提交。配合 lint-staged 可以防止未跑通單元測試的代碼進行遠程提交:
"scripts": {
  "lint": "eslint src --max-warnings 0",
  "test": "jest --bail --coverage",
},
"lint-staged": {
  "*.ts": [
    "npm run lint",
    "npm run test"
  ]
}
此時如果單元測試有誤,都會停止代碼提交:
husky > pre-commit (node v12.13.1)
[STARTED] Preparing...
[SUCCESS] Preparing...
[STARTED] Running tasks...
[STARTED] Running tasks for *.ts
[STARTED] npm run lint
[SUCCESS] npm run lint
[STARTED] npm run jest
[FAILED] npm run jest [FAILED]
[FAILED] npm run jest [FAILED]
[SUCCESS] Running tasks...
[STARTED] Applying modifications...
[SKIPPED] Skipped because of errors from tasks.
[STARTED] Reverting to original state because of errors...
[SUCCESS] Reverting to original state because of errors...
[STARTED] Cleaning up...
[SUCCESS] Cleaning up...

× npm run jest:
FAIL test/greet.spec.ts
  src/greet.ts
    × name param test (4 ms)

  ● src/greet.ts › name param test

    expect(received).toBe(expected) // Object.is equality

    Expected: "Hello from world 1"
    Received: "Hello from world"

      3 | describe("src/greet.ts", () => {
      4 |   it("name param test", () => {
    > 5 |     expect(greet("world")).toBe("Hello from world 1");
        |                            ^
      6 |   });
      7 | });
      8 |

      at Object.<anonymous> (test/greet.spec.ts:5:28)

Test Suites: 1 failed, 1 total
Tests:       1 failed, 1 total
Snapshots:   0 total
Time:        1.339 s, estimated 3 s
Ran all test suites related to files matching /C:\Code\Git\algorithms\src\index.ts|C:\Code\Git\algorithms\test\greet.spec.ts/i.
npm ERR! code ELIFECYCLE
npm ERR! errno 1
npm ERR! [email protected] jest: `jest --bail --findRelatedTests --coverage "C:/Code/Git/algorithms/src/index.ts" "C:/Code/Git/algorithms/test/greet.spec.ts"`
npm ERR! Exit status 1
npm ERR!
npm ERR! Failed at the [email protected] jest script.
npm ERR! This is probably not a problem with npm. There is likely additional logging output above.

npm ERR! A complete log of this run can be found in:
npm ERR!     C:Users子弈AppDataRoamingnpm-cache_logs2020-07-12T14_33_51_183Z-debug.log

> [email protected] jest C:CodeGitalgorithms
> jest --bail --findRelatedTests --coverage "C:/Code/Git/algorithms/src/index.ts" "C:/Code/Git/algorithms/test/greet.spec.ts"

----------|---------|----------|---------|---------|-------------------
| File       | % Stmts   | % Branch   | % Funcs   | % Lines   | Uncovered Line #s   |
| ---------- | --------- | ---------- | --------- | --------- | ------------------- |
| All files  | 0         | 0          | 0         | 0         |
| ---------- | --------- | ---------- | --------- | --------- | ------------------- |
husky > pre-commit hook failed (add --no-verify to bypass)
git exited with error code 1
溫馨提示:想要了解更多關(guān)于 Jest 的生態(tài)可以查看 awesome-jest[113]。
Jest 對于 ESLint 支持
src 目錄下的源碼通過配置 @typescript-eslint/eslint-plugin 可進行推薦規(guī)則的 ESLint 校驗,為了使得 test 目錄下的測試代碼能夠進行復合 Jest 推薦規(guī)則的 ESLint 校驗,可以通過配置 eslint-plugin-jest[114] 進行支持(ts-jest 項目就是采用了該插件進行 ESLint 校驗,具體可查看配置文件 `ts-jest/.eslintrc.js`[115]),這里仍然采用推薦的規(guī)則配置:
module.exports = {
  root: true,
  parser: "@typescript-eslint/parser",
  plugins: ["@typescript-eslint"],
  extends: [
    "eslint:recommended",
    "plugin:@typescript-eslint/recommended",
    // 新增推薦的 ESLint 校驗規(guī)則
    // 所有規(guī)則集查看:https://github.com/jest-community/eslint-plugin-jest#rules(recommended 標識表明是推薦規(guī)則)
    "plugin:jest/recommended",
  ],
};
為了驗證推薦規(guī)則是否生效,這里可以找一個 `no-identical-title`[116] 規(guī)則進行驗證:
import greet from "@/greet";
describe("src/greet.ts", () => {
  it("name param test", () => {
    expect(greet("world")).toBe("Hello from world 1");
  });
});

// 這里輸入了重復的 title
describe("src/greet.ts", () => {
  it("name param test", () => {
    expect(greet("world")).toBe("Hello from world 1");
  });
});
需要注意修改 package.json 中的 ESLint 校驗范圍:
"scripts": {
  // 這里對 src 和 test 目錄進行 ESLint 校驗
  "lint": "eslint src test --max-warnings 0",
},
執(zhí)行 npm run lint 進行單元測試的格式校驗:
PS C:CodeGitalgorithms> npm run lint

> [email protected] lint C:CodeGitalgorithms
> eslint src test --max-warnings 0


C:CodeGitalgorithmstestgreet.spec.ts
  9:10  error  Describe block title is used multiple times in the same describe block  jest/no-identical-title

? 1 problem (1 error, 0 warnings)

npm ERR! code ELIFECYCLE
npm ERR! errno 1
npm ERR! [email protected] lint: `eslint src test --max-warnings 0`
npm ERR! Exit status 1
npm ERR!
npm ERR! Failed at the [email protected] lint script.
npm ERR! This is probably not a problem with npm. There is likely additional logging output above.

npm ERR! A complete log of this run can be found in:
npm ERR!     C:Users子弈AppDataRoamingnpm-cache_logs2020-07-13T02_25_12_043Z-debug.log
此時會發(fā)現(xiàn) ESLint 拋出了相應(yīng)的錯誤信息。需要注意采用此 ESLint 校驗之后也會在 VS Code 中實時生成錯誤提示(相應(yīng)的代碼下會有紅色波浪線,鼠標移入后會產(chǎn)生 Tooltip 提示該錯誤的相應(yīng)規(guī)則信息,除此之外當前工程目錄下對應(yīng)的文件名也會變成紅色),此后的 Git 提交以及 Build 構(gòu)建都會失敗!
溫馨提示:如果你希望 Jest 測試的代碼需要一些格式規(guī)范,那么可以查看 eslint-plugin-jest-formatting[117] 插件。
Npm Script Hook
當你查看前端開源項目時第一時間可能會找 package.json 中的 main、bin 以及files 等字段信息,除此之外如果還想深入了解項目的結(jié)構(gòu),可能還會查看scripts 腳本字段信息用于了解項目的開發(fā)、構(gòu)建、測試以及安裝等流程。npm 的腳本功能非常強大,你可以利用腳本制作項目需要的任何流程工具。本文不會過多介紹 npm 腳本的功能,只是講解一下其中用到的 鉤子[118] 功能。
目前在本項目中使用的一些腳本命令如下(就目前而言腳本相對較少,定義還蠻清晰的):
"lint": "eslint src test --max-warnings 0",
"test": "jest --bail --coverage",
"build": "npm run lint && npm run prettier && npm run test && rimraf dist types && gulp",
"changelog": "rimraf CHANGELOG.md && conventional-changelog -p angular -i CHANGELOG.md -s"
重點看下 build 腳本命令,會發(fā)現(xiàn)這個腳本命令包含了大量的繼發(fā)執(zhí)行腳本,但真正和 build 相關(guān)的只有 rimraf dist types && gulp 這兩個腳本。這里通過 npm 的腳本鉤子 pre 和 post 將腳本的功能區(qū)分開,從而使腳本的語義更加清晰(當然腳本越來越多的時候也可能容易增加開發(fā)者的認知負擔)。npm 除了指定一些特殊的腳本鉤子以外(例如prepublish、postpublish、preinstall、postinstall等),還可以對任意腳本增加 pre 和 post 鉤子,這里通過自定義鉤子將并發(fā)執(zhí)行的腳本進行簡化:
"lint": "eslint src test --max-warnings 0",
"test": "jest --bail --coverage",
"prebuild": "npm run lint && npm run prettier && npm run test",
"build": "rimraf dist types && gulp",
"changelog": "rimraf CHANGELOG.md && conventional-changelog -p angular -i CHANGELOG.md -s"
此時如果執(zhí)行 npm run build 命令時事實上類似于執(zhí)行了以下命令:
npm run prebuild && npm run build
之后設(shè)計的腳本如果繼發(fā)執(zhí)行繁多,那么都會采用 npm scripts hook 進行設(shè)計。
溫馨提示:大家可能會奇怪什么地方需要類似于 preinstall 或 preuninstall 這樣的鉤子,例如查看 husky - package.json[119],husky 在安裝的時候因為要植入 Git Hook 腳本從而帶來了一些副作用(此時當然可以通過 preinstall觸發(fā) Git Hook 腳本植入的邏輯)。如果不想使用 husky,那么卸載后需要清除植入的腳本從而不妨礙原有的 Git Hook 功能。當然如果想要了解更多關(guān)于 npm 腳本的信息,可以查看 npm-scripts[120] 或 npm scripts 使用指南[121]。
Vuepress
Vuepress 背景
一般組件庫或工具庫都需要設(shè)計一個演示文檔(提供良好的開發(fā)體驗)。一般的工具庫可以采用 tsdoc[122]、jsdoc[123] 或 esdoc[124] 等工具進行 API 文檔的自動生成,但往往需要符合一些注釋規(guī)范,這些注釋規(guī)范在某種程度上可能會帶來開發(fā)負擔,當然也可以交給 VS Code 的插件進行一鍵生成,例如 Document This For jsdoc[125] 或 TSDoc Comment[126]。
組件庫 Element UI 采用 vue-markdown-loader[127](Convert Markdown file to Vue Component using markdown-it) 進行組件的 Demo 演示設(shè)計,但是配置相對復雜。更簡單的方式是配合 Vuepress[128] 進行設(shè)計,它的功能非常強大,但前提是熟悉 Vue,因為可以在 Markdown 中使用 Vue 語法。當然如果是 React 組件庫的 Demo 演示,則可以采用 dumi[129] 生成組件 Demo 演示文檔(不知道沒有更加好用的類 Vuepress 的 React 組件文檔生成器, 更多和 React 文檔相關(guān)也可以了解 react-markdown[130]、react-static[131] 等)。
由于之前采用過 Vuepress 設(shè)計 Vue 組件庫的 Demo 演示文檔,因此這里仍然沿用它來設(shè)計工具庫包的 API 文檔(如果你想自動生成 API 文檔,也可以額外配合 tsdoc 工具)。采用 Vuepress 設(shè)計文檔的主要特點如下:
- 可以在 Markdown 中直接使用 Vue(還可以自定義 Vue 文檔視圖組件)
- 內(nèi)置了很多 Markdown 拓展
- 可以使用 Webpack 進行構(gòu)建定制化配置
- 默認主題支持搜索能力
- 可以安裝 Vuepress 插件(后續(xù)需要支持的 Latex[132] 排版就可以利用現(xiàn)有的插件能力生成)
- 默認響應(yīng)式
Vuepress 配置
先按照官方的 快速上手[133] 文檔進行依賴安裝和 npm scripts 腳本設(shè)置:
"scripts": {
  "docs:dev": "vuepress dev docs",
  "docs:build": "vuepress build docs"
}
按照 Vuepress 官網(wǎng)約定優(yōu)于配置的原則進行演示文檔的目錄結(jié)構(gòu)[134]設(shè)計,官方的文檔可能一下子難以理解,可以先設(shè)計一個最簡單的目錄:
.
├── docs
│   ├── .vuepress
│   │   └── config.js       # 配置文件
│   └── README.md           # 文檔首頁
└── package.json
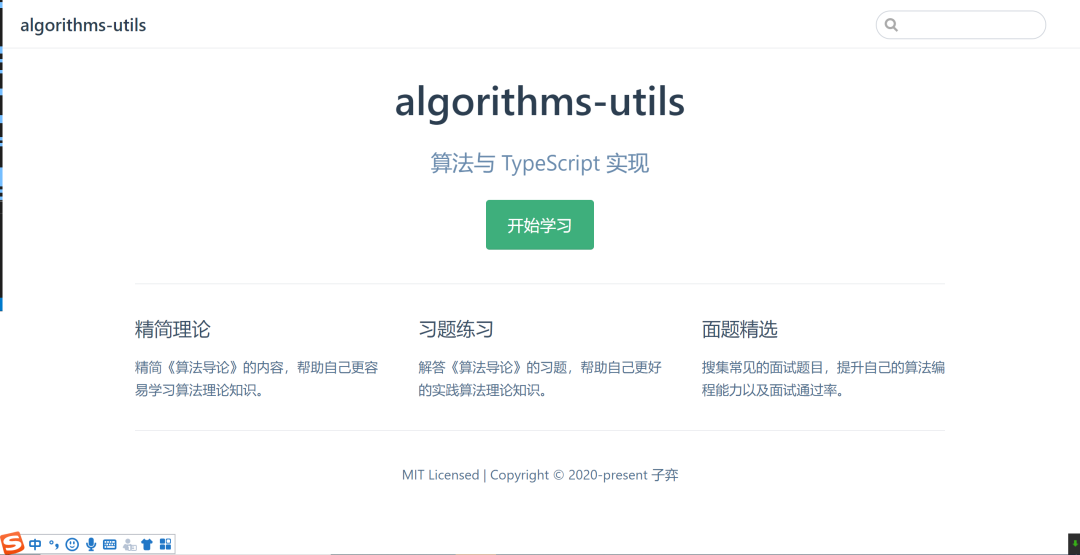
根據(jù)默認主題 / 首頁[135]在 docs/README.md 進行首頁設(shè)計:
---
home: true
# heroImage: /hero.png
heroText: algorithms-utils
tagline: 算法與 TypeScript 實現(xiàn)
actionText: 開始學習
actionLink: /guide/
features:
  - title: 精簡理論
    details: 精簡《算法導論》的內(nèi)容,幫助自己更容易學習算法理論知識。
  - title: 習題練習
    details: 解答《算法導論》的習題,幫助自己更好的實踐算法理論知識。
  - title: 面題精選
    details: 搜集常見的面試題目,提升自己的算法編程能力以及面試通過率。
footer: MIT Licensed | Copyright © 2020-present 子弈
---
根據(jù)配置[136] 對 docs/.vuepress/config.js 文件進行基本配置:
const packageJson = require("../../package.json");

module.exports = {
  // 配置網(wǎng)站標題
  title: packageJson.name,
  // 配置網(wǎng)站描述
  description: packageJson.description,
  // 配置基本路徑
  base: "/algorithms/",
  // 配置基本端口
  port: "8080",
};
此時通過 npm run docs:dev 進行開發(fā)態(tài)文檔預(yù)覽:
PS C:CodeGitalgorithms> npm run docs:dev

> [email protected] docs:dev C:CodeGitalgorithms
> vuepress dev docs

wait Extracting site metadata...
tip Apply theme @vuepress/theme-default ...
tip Apply plugin container (i.e. "vuepress-plugin-container") ...
tip Apply plugin @vuepress/register-components (i.e. "@vuepress/plugin-register-components") ...
tip Apply plugin @vuepress/active-header-links (i.e. "@vuepress/plugin-active-header-links") ...
tip Apply plugin @vuepress/search (i.e. "@vuepress/plugin-search") ...
tip Apply plugin @vuepress/nprogress (i.e. "@vuepress/plugin-nprogress") ...

√ Client
  Compiled successfully in 5.31s

i ?wds?: Project is running at http://0.0.0.0:8080/
i ?wds?: webpack output is served from /algorithms-utils/
i ?wds?: Content not from webpack is served from C:CodeGitalgorithmsdocs.vuepresspublic
i ?wds?: 404s will fallback to /index.html
success [23:13:14] Build 10b15a finished in 5311 ms!
> VuePress dev server listening at http://localhost:8080/algorithms-utils/
效果如下:
當然除了以上設(shè)計的首頁,在本項目中還會設(shè)計導航欄[137]、側(cè)邊欄[138]、使用插件[139]、使用組件[140]等。這里重點講解一下 Webpack 構(gòu)建[141] 配置。
為了在 Markdown 文檔中可以使用 src 目錄的 TypeScript 代碼,這里對 .vuepress/config.js 文件進行配置處理:
const packageJson = require("../../package.json");
const sidebar = require("./config/sidebar.js");
const nav = require("./config/nav.js");
const path = require("path");

module.exports = {
  title: packageJson.name,
  description: packageJson.description,
  base: "/algorithms/",
  port: "8080",

  themeConfig: {
    nav,
    sidebar,
  },

  plugins: [
    "vuepress-plugin-cat",
    [
      "mathjax",
      {
        target: "svg",
        macros: {
          "*": "\times",
        },
      },
    ],
    // 增加 Markdown 文檔對于 TypeScript 語法的支持
    [
      "vuepress-plugin-typescript",
      {
        tsLoaderOptions: {
          // ts-loader 的所有配置項
        },
      },
    ],
  ],

  chainWebpack: (config) => {
    config.resolve.alias.set("image", path.resolve(__dirname, "public"));

    // 在文檔中模擬庫包的引入方式
    // 例如發(fā)布了 algorithms-utils 庫包之后,
    // import greet from 'algorithms-utils/greet.ts' 在 Vuepress 演示文檔中等同于
    // import greet from '~/src/greet.ts',
    // 其中 ~ 在這里只是表示項目根目錄
    config.resolve.alias.set(
      "algorithms-utils",
      path.resolve(__dirname, "../../src")
    );
  },
};
溫馨提示:這里的 Webpack 配置采用了 webpack-chain[142] 鏈式操作,如果想要采用 Webpack 對象的配置方式則可以查看 Vuepress - 構(gòu)建流程 - configurewebpack[143]。
此時可以在 Vuepress 的 Markdown 文檔中進行 TypeScript 引入的演示文檔設(shè)計:
# Test vuepress

::: danger 測試 Vuepress
引入 greet.ts 并進行調(diào)用測試。
:::

<template>
  <collapse title="查看答案">{{msg}}</collapse>
</template>

<template>
  <div>{{msg}}</div>
</template>

<script lang="ts">
  import greet from 'algorithms-utils/greet'
  const msg = greet('ziyi')
  export default {
    data() {
      return {
         msg
      }
    },
  }
</script>
啟動 Vuepress 查看演示文檔:
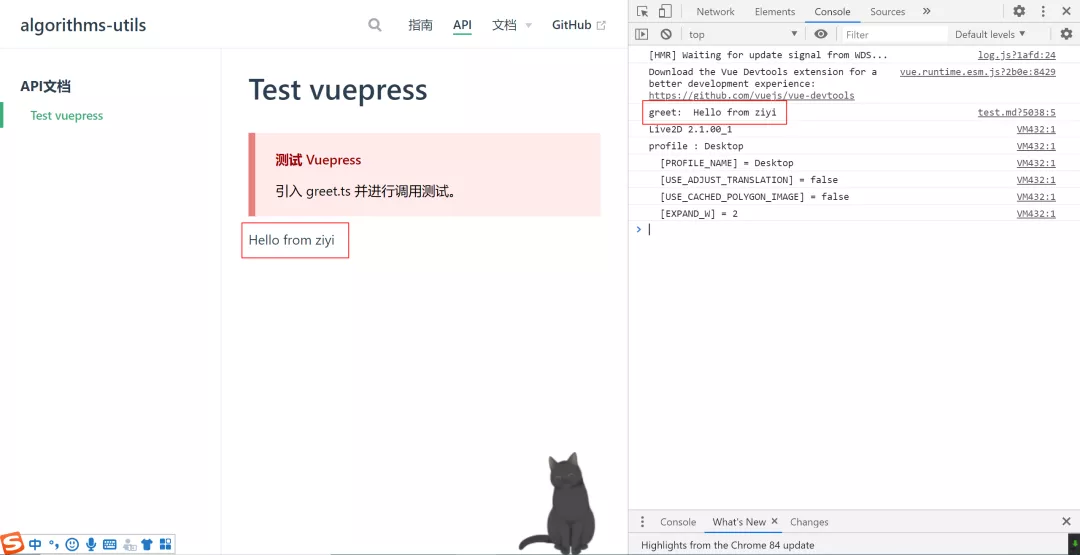
可以發(fā)現(xiàn)在 Markdown 中引入的 src/greet.ts 代碼生效了,最終通過 npm run docs:build 可以生成演示文檔的靜態(tài)資源進行部署和訪問。
溫馨提示:更多本項目的 Vuepress 配置信息可查看 Commit 信息,除此之外如果還想知道更多 Vuepress 的生態(tài),例如有哪些有趣插件或主題,可查看 awesome-vuepress[144] 或 Vuepress 社區(qū)[145]。
文檔工具和規(guī)范
通常在書寫文檔的時候很多同學都不注重文檔的潔癖,其實書寫文檔和書寫代碼一樣需要一些格式規(guī)范。markdownlint[146] 是類似于 ESLint 的 Markdown 格式校驗工具,通過它可以更好的規(guī)范我們書寫的文檔。當然 Markdown 的格式校驗不需要像 ESLint 或者 Prettier 校驗?zāi)菢舆M行強約束,簡單的能夠做到提示和 Save Auto Fix 即可。
通過安裝 Vs Code 插件 markdownlint[147] 并進行 Save Auto Fix 配置(在插件中明確列出了哪些規(guī)則是可以被 Fix 的)。安裝完成后查看剛剛進行的測試文件:
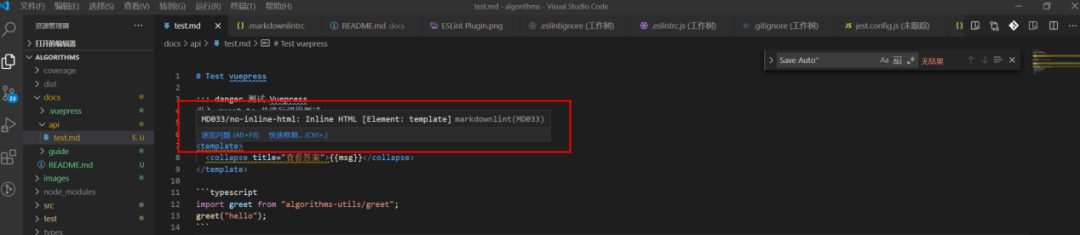
此時會發(fā)現(xiàn)插件生效了,但是在 Markdown 中插入 html 是必須的一個能力(Vuepress 支持的能力就是在 Markdown 中使用 Vue),因此可以通過 .markdownlintrc 文件將相應(yīng)的規(guī)則屏蔽掉。
溫馨提示:如果你希望在代碼提交之前或文檔構(gòu)建之前能夠進行 Markdown 格式校驗,則可以嘗試它的命令行接口 markdownlint-cli[148]。除此之外,如果對文檔的設(shè)計沒有想法或者不清楚如何書寫好的技術(shù)文檔,可以查看 技術(shù)文章的寫作技巧分享[149],一定能讓你有所收獲。
Github Actions
CI / CD 背景
前提提示:個人對于 CI / CD 可能相對不夠熟悉,只是簡單的玩過 Travis、Gitlab CI / CD 以及 Jenkins。
關(guān)于 CI / CD 的背景這里就不再過多介紹,有興趣的同學可以看看以下一些好文:
- Introduction to CI/CD with GitLab(中文版)[150]
- GitHub Actions 入門教程[151]
- Github Actions 官方文檔[152]
- 當我有服務(wù)器時我做了什么 · 個人服務(wù)器運維指南[153](這個系列有點佩服啊)
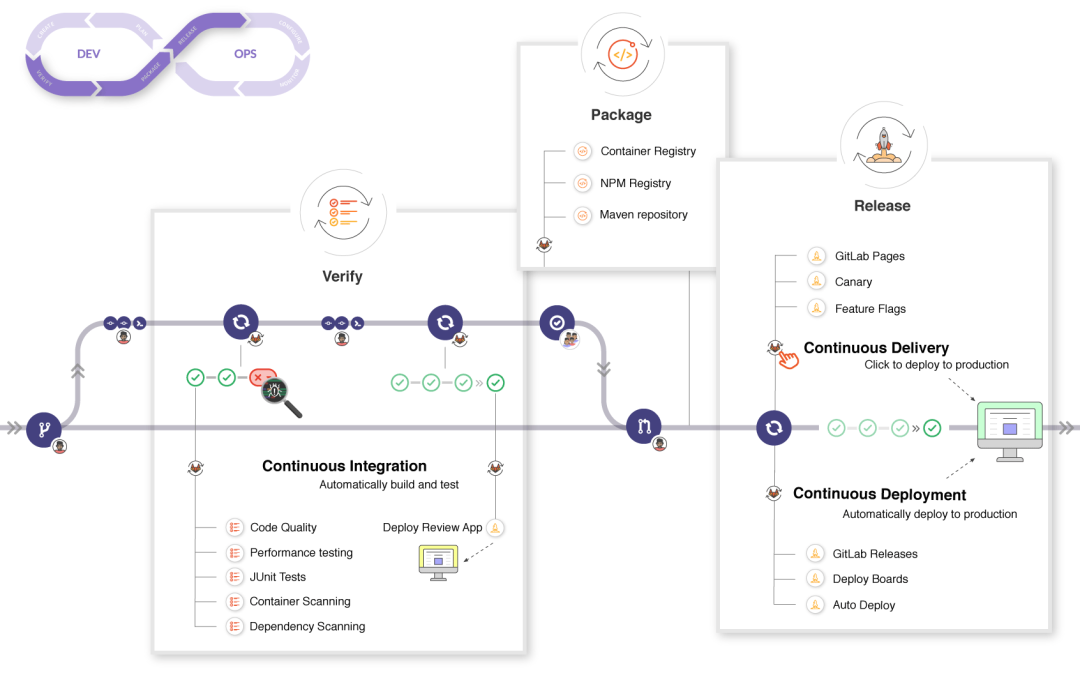
在 Introduction to CI/CD with GitLab(中文版)[154] 中你可以清晰的了解到 CI 和 CD 的職責功能:
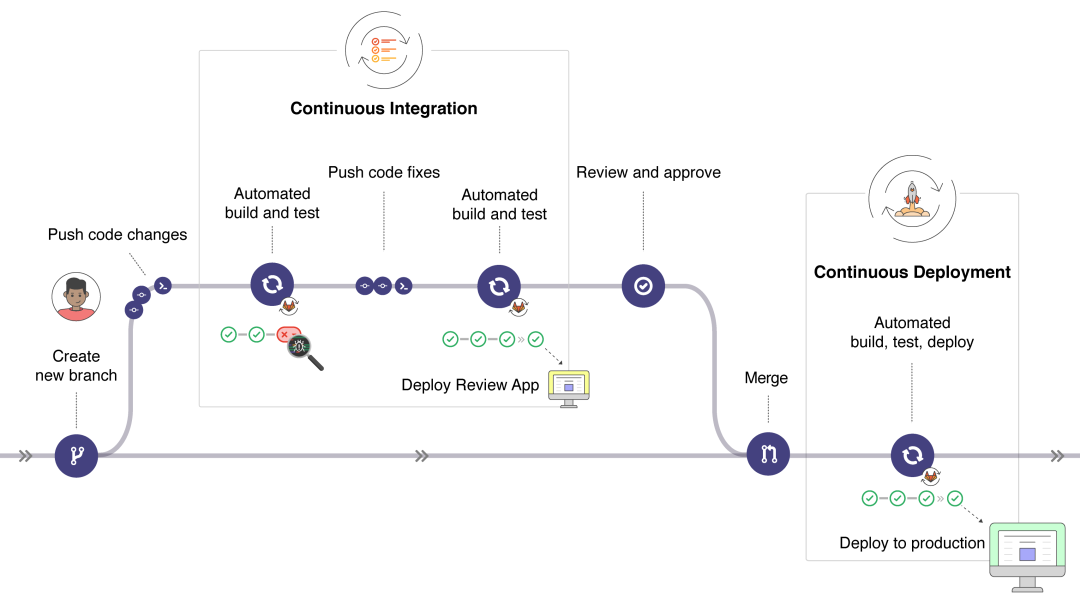
通過以下圖可以更清晰的發(fā)現(xiàn) Gitlab 在每個階段可用的功能:
由于本項目依賴 Github,因此沒法使用 Gitlab 默認集成的能力。之前的 Github 項目采用了 Travis 進行項目的 CI / CD 集成,現(xiàn)在因為有了更方便的 Github Actions,因此決定采用 Github 自帶的 Actions 進行 CI / CD 能力集成(大家如果想更多了解這些 CI / CD 的差異請自行 google 哈)。Github Actions 所帶來的好處在于:
- 可復用的 Actions(以前你需要寫復雜的腳本,現(xiàn)在可以復用別人寫好的腳本,可以簡單理解為 CI 腳本插件化)
- 支持更多的 webhook[155],這些當然是 Github 生態(tài)特有的競爭力
當然也會產(chǎn)生一些限制[156],這些限制主要是和執(zhí)行時間以及次數(shù)相關(guān)。需要注意類似于 Jenkins 等支持本地連接運行,Github Actions 也支持連接到本地機器運行 workflow,因此部分限制可能不受本地運行的限制。
溫馨提示:本項目中使用到的 CI / CD 功能相對簡單,如果想了解更多通用的 Actions,可查看 官方 Actions[157] 和 awesome-actions[158]。最近在使用 Jenkins 做前端的自動化構(gòu)建優(yōu)化,后續(xù)可能會出一篇簡單的教程文章(當然會跟普通講解的用法會有所不同嘍)。
Github Actions 配置
本項目的配置可能會包含以下三個方面:
- 自動更新靜態(tài)資源流程
- 發(fā)布庫包流程
- 提交 Pull Request 流程
這里主要講解自動更新靜態(tài)資源流程,大致需要分為以下幾個步驟(以下都是在 Github 服務(wù)器上進行操作,你可以理解為新的服務(wù)環(huán)境):
- 拉取當前 Github 倉庫代碼并切換到相應(yīng)的分支
- 安裝 Node 和 Npm 環(huán)境
- 安裝項目的依賴
- 構(gòu)建庫包和演示文檔的靜態(tài)資源
- 發(fā)布演示文檔的靜態(tài)資源
通過查看 官方 Actions[159] 和 awesome-actions[160],找到所需的 Actions:
- Checkout[161]: 從 Github 拉取倉庫代碼到 Github 服務(wù)器的 $GITHUB_WORKSPACE目錄下
- cache[162]: 緩存 npm
- setup-node[163]: 安裝 Node 和 Npm 環(huán)境
- actions-gh-pages[164]: 在 Github 上發(fā)布靜態(tài)資源
溫馨提示:可用的 Action 很多,這里只是設(shè)置了一個簡單的流程。
在 .github/workflows 下新增 mian.yml 配置文件:
# 以下都是官方文檔的簡單翻譯
# 當前的 yml(.yaml) 文件是一個 workflow,是持續(xù)集成一次運行的一個過程,必須放置在項目的 .github/workflow 目錄下
# 如果不清楚 .yml 文件格式語法,可以查看 https://www.codeproject.com/Articles/1214409/Learn-YAML-in-five-minutes
# 初次編寫難免會產(chǎn)生格式問題,可以使用 VS Code 插件進行格式檢測,https://marketplace.visualstudio.com/items?itemName=OmarTawfik.github-actions-vscode
# 具體各個配置屬性可查看 https: //docs.github.com/en/actions/reference/workflow-syntax-for-github-actions
# workflow 的執(zhí)行仍然會受到一些限制,例如
# - 每個 job 最多執(zhí)行 6 小時(本地機器不受限制)
# - 每個 workflow 最多執(zhí)行 72 小時
# - 并發(fā) job 的數(shù)量會受到限制
# - 更多查看 https: //docs.github.com/en/actions/reference/workflow-syntax-for-github-actions#usage-limits
# name: 當前 workflow 的名稱
name: Algorithms
# on: 指定 workflow 觸發(fā)的 event
#
# event 有以下幾種類型
# - webhook
# - scheduled
# - manual
on:
# push: 一個 webhook event,用于提交代碼時觸發(fā) workflow,也可以是觸發(fā)列表,例如 [push, pull_request]
# workflows 觸發(fā)的 event 大部分是基于 webhook 配置,以下列舉幾個常見的 webhook:
# - delete: 刪除一個 branch 或 tag 時觸發(fā)
# - fork / watch: 某人 fork / watch 項目時觸發(fā)(你問有什么用,發(fā)送郵件通知不香嗎?)
# - pull_request: 提交 PR 時觸發(fā)
# - page_build: 提交 Github Pages-enabled 分支代碼時觸發(fā)
# - push: 提交代碼到特定分支時觸發(fā)
# - registry_package: 發(fā)布或跟新 package 時觸發(fā)
# 更多 webhook 可查看 https: //docs.github.com/en/actions/reference/events-that-trigger-workflows
# 從這里可以看出 Git Actions 的一大特點就是 Gihub 官方提供的一系列 webhook
push:
# branches: 指定 push 觸發(fā)的特定分支,這里你可以通過列表的形式指定多個分支
branches:
- feat/framework
#
# branches 的指定可以是通配符類型,例如以下配置可以匹配 refs/heads/releases/10
# - 'releases/**'
#
# branches 也可以使用反向匹配,例如以下不會匹配 refs/heads/releases/10
# - '!releases/**'
#
# branches-ignore: 只對 [push, pull_request] 兩個 webhook 起作用,用于指定當前 webhook 不觸發(fā)的分支
# 需要注意在同一個 webhook 中不能和 branches 同時使用
#
# tags: 只對 [push, pull_request] 兩個 webhook 起作用,用于指定當前 webhook 觸發(fā)的 tag
#
# tags:
# - v1 # Push events to v1 tag
# - v1.* # Push events to v1.0, v1.1, and v1.9 tags
#
# tags-ignore: 類似于 branches-ignore
#
# paths、paths-ignore...
#
# 更多關(guān)于特定過濾模式可查看 https://docs.github.com/en/actions/reference/workflow-syntax-for-github-actions#filter-pattern-cheat-sheet
#
# 其他的 webhook 控制項還包括 types(不是所有的 webhook 都有 types),例如已 issues 為例,可以在 issues 被 open、reopened、closed 等情況下觸發(fā) workflow
# 更多 webhook 的 types 可查看 https: //docs.github.com/en/actions/reference/events-that-trigger-workflows#webhook-events
#
# on:
# issues:
# types: [opened, edited, closed]
# 除此之外如果對于每個分支有不同的 webhook 觸發(fā),則可以通過以下形式進行多個 webhook 配置
#
# push:
# branches:
# - master
# pull_request:
# branches:
# - dev
#
# 除了以上所說的 webhook event,還有 scheduled event 和 manual event
# scheduled event: 用于定時構(gòu)建,例如最小的時間間隔是 5 min 構(gòu)建一次
# 具體可查看 https: //docs.github.com/en/actions/reference/events-that-trigger-workflows#scheduled-events
# env: 指定環(huán)境變量(所有的 job 生效,每一個 job 可以獨立通過 jobs.<job_id>.env、jobs.<job_id>.steps.env 配置)
# defaults / defaults.run: 所有的 job 生效,每一個 job 可以獨立通過 jobs.<job_id>.defaults 配置
# deafults
# defaults.run
# jobs: 一個 workflow 由一個或多個 job 組成
jobs:
# job id: 是 job 的唯一標識,可以通過 _ 進行連接,例如: my_first_job,例如這里的 build 就是一個 job id
build_and_deploy:
# name: 在 Github 中顯示的 job 名稱
name: Build And Deploy
#
# needs: 用于繼發(fā)執(zhí)行 job,例如當前 job build 必須在 job1 和 job2 都執(zhí)行成功的基礎(chǔ)上執(zhí)行
# needs: [job1, job2]
#
# runs-on: job 運行的環(huán)境配置,包括:
# - windows-latest
# - windows-2019
# - ubuntu-20.04
# - ubuntu-latest
# - ubuntu-18.04
# - ubuntu-16.04
# - macos-latest
# - macos-10.15
# - self-hosted(本地機器,具體可查看 https: //docs.github.com/en/actions/hosting-your-own-runners/using-self-hosted-runners-in-a-workflow)
runs-on: ubuntu-latest
#
# outputs: 用于輸出信息
#
# env: 用于設(shè)置環(huán)境變量
#
# defaults: 當前所有 step 的默認配置
#
# defaults.run
# if: 滿足條件執(zhí)行當前 job
# steps: 一個 job 由多個 step 組成,step 可以
# - 執(zhí)行一系列 tasks
# - 執(zhí)行命令
# - 執(zhí)行 action
# - 執(zhí)行公共的 repository
# - 在 Docker registry 中的 action
steps:
#
# id: 類似于 job id
#
# if: 類似于 job if
#
# name: 當前 step 的名字
- name: Checkout
#
# uses: 用于執(zhí)行 action
#
# action: 可以重復使用的單元代碼
# - 為了 workflow 的安全和穩(wěn)定建議指定 action 的發(fā)布版本或 commit SHA
# - 使用指定 action 的 major 版本,這樣可以允許你接收 fixs 以及 安全補丁并同時保持兼容性
# - 盡量不建議使用 master 版本,因為 master 很有可能會被發(fā)布新的 major 版本從而破壞了 action 的兼容性
# - action 可能是 JAVAScript 文件或 Docker 容器,如果是 Docker 容器,那么 runs-on 必須指定 linux 環(huán)境
#
# 指定固定 commit SHA
# uses: actions/setup-node@74bc508
# 指定一個 major 發(fā)布版本
# uses: actions/setup-node@v1
# 指定一個 minor 發(fā)布版本
# uses: actions/[email protected]
# 指定一個分支
# uses: actions/setup-node@master
# 指定一個 Github 倉庫子目錄的特定分支、ref 或 SHA
# uses: actions/aws/ec2@master
# 指定當前倉庫所在 workflows 的目錄地址
# uses: ./.github/actions/my-action
# 指定在 Dock Hub 發(fā)布的 Docker 鏡像地址
# uses: docker: //alpine: 3.8
# A Docker image in a public registry
# uses: docker: //gcr.io/cloud-builders/gradle
# checkout action 主要用于向 github 倉庫拉取源代碼(需要注意 workflow 是運行在服務(wù)器上,因此需要向當前 github 拉取倉庫源代碼)
# 它的功能包括但不限于
# - Fetch all history for all tags and branches
# - Checkout a different branch
# - Checkout HEAD^
# - Checkout multiple repos (side by side)
# - Checkout multiple repos (nested)
# - Checkout multiple repos (private)
# - Checkout pull request HEAD commit instead of merge commit
# - Checkout pull request on closed event
# - Push a commit using the built-in token
# checkout action: https: //github.com/actions/checkout
uses: actions/checkout@v2
# with: action 提供的輸入?yún)?shù)
with:
# 指定 checkout 的分支、tag 或 SHA
# 更多 checkout action 的配置可查看 https: //github.com/actions/checkout#usage
ref: feat/ci
# args: 用于 Docker 容器的 CMD 指令參數(shù)
# entrypoint: Docker 容器 action(覆蓋 Dockerfile 的 ENTRYPOINT) 和 JavaScript action 都可以使用
#
# run: 使用當前的操作系統(tǒng)的默認的 non-login shell 執(zhí)行命令行程序
# 運行單個腳本
# run: npm install
# 運行多個腳本
# run: |
# npm ci
# npm run build
#
# working-directory: 用于指定當前腳本運行的目錄
# working-directory: ./temp
#
# shell: 可以指定 shell 類型進行執(zhí)行,例如 bash、pwsh、Python、sh、cmd、powershell
# shell: bash
#
# env: 除了可以設(shè)置 workflow 以及 job 的 env,也可以設(shè)置 step 的 env(可以理解為作用域不同,局部作用域的優(yōu)先級更高)
#
# comtinue-on-error: 默認當前 step 失敗則會阻止當前 job 繼續(xù)執(zhí)行,設(shè)置 true 時當前 step 失敗則可以跳過當前 job 的執(zhí)行
- name: Cache
# cache action: https://github.com/actions/cache
# cache 在這里主要用于緩存 npm,提升構(gòu)建速率
uses: actions/cache@v2
# npm 緩存的路徑可查看 https://docs.npmjs.com/cli/cache#cache
# 由于這里 runs-on 是 ubuntu-latest,因此配置 ~/.npm
with:
path: ~/.npm
key: ${{ runner.os }}-node-${{ hashFiles('**/package-lock.json') }}
restore-keys: |
${{ runner.os }}-node-
# github-script action: https://github.com/actions/github-script
# 在 workflow 中使用 Script 語法調(diào)用 Github API 或引用 workflow context
# setup-node action: https://github.com/actions/setup-node
# 配置 Node 執(zhí)行環(huán)境(當前構(gòu)建的服務(wù)器默認沒有 Node 環(huán)境,可以通過 Action 安裝 Node)
# 需要注意安裝 Node 的同時會捆綁安裝 npm,如果想了解為什么會捆綁,可以 Google 一下有趣的故事哦
# 因此使用了該 action 后就可以使用 npm 的腳本在服務(wù)器進行執(zhí)行啦
# 這里也可以嘗試 v2-beta 版本哦
- name: Set Node
uses: actions/setup-node@v1
with:
# 也可以通過 strategy.matrix.node 進行靈活配置
# 這里本地使用 node 的 12 版本構(gòu)建,因此這里就進行版本固定啦
node-version: "12"
- run: npm install
- run: npm run build
- run: npm run docs:build
- name: Deploy
# 用于發(fā)布靜態(tài)站點資源
# actions-gh-pages action: https://github.com/peaceiris/actions-gh-pages
uses: peaceiris/actions-gh-pages@v3
with:
# GTIHUB_TOKEN:https://docs.github.com/en/actions/configuring-and-managing-workflows/authenticating-with-the-github_token
# Github 會在 workflow 中自動生成 GIHUBT_TOKEN,用于認證 workflow 的運行
github_token: ${{ secrets.GITHUB_TOKEN }}
# 靜態(tài)資源目錄設(shè)置
publish_dir: ./docs/.vuepress/dist
# 默認發(fā)布到 gh-pages 分支上,可以指定特定的發(fā)布分支
publish_branch: gh-pages1 # default: gh-pages
full_commit_message: ${{ github.event.head_commit.message }}
#
# timeout-minutes: 一個 job 執(zhí)行的最大時間,默認是 6h,如果超過時間則取消執(zhí)行
#
# strategy.matrix: 例如指定當前 job 的 node 版本列表、操作系統(tǒng)類型列表等
# strategy.fail-fast
# strategy.max-parallel
# continue-on-error: 一旦當前 job 執(zhí)行失敗,那么 workflow 停止執(zhí)行。設(shè)置為 true 可以跳過當前 job 執(zhí)行
# container: Docker 容器配置,包括 image、env、ports、volumes、options 等配置
#
# services: 使用 Docker 容器 Action 或者 服務(wù) Action 必須使用 Linux 環(huán)境運行
溫馨提示:這里不再敘述具體的配置過程,更多可查看配置文件中貼出的鏈接信息。
上傳 CI 的配置文件后,Github 就會進行自動構(gòu)建,具體如下:
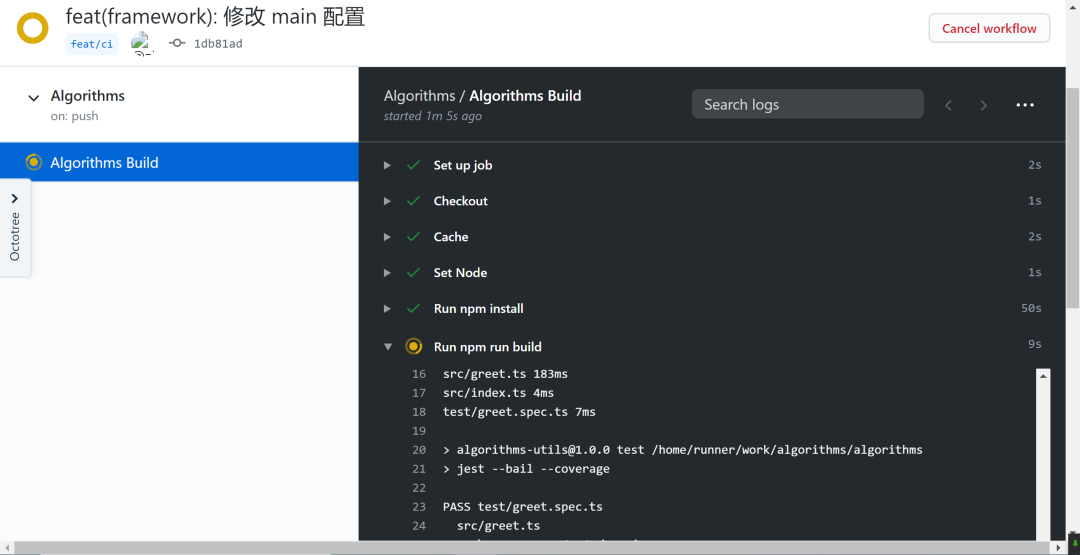
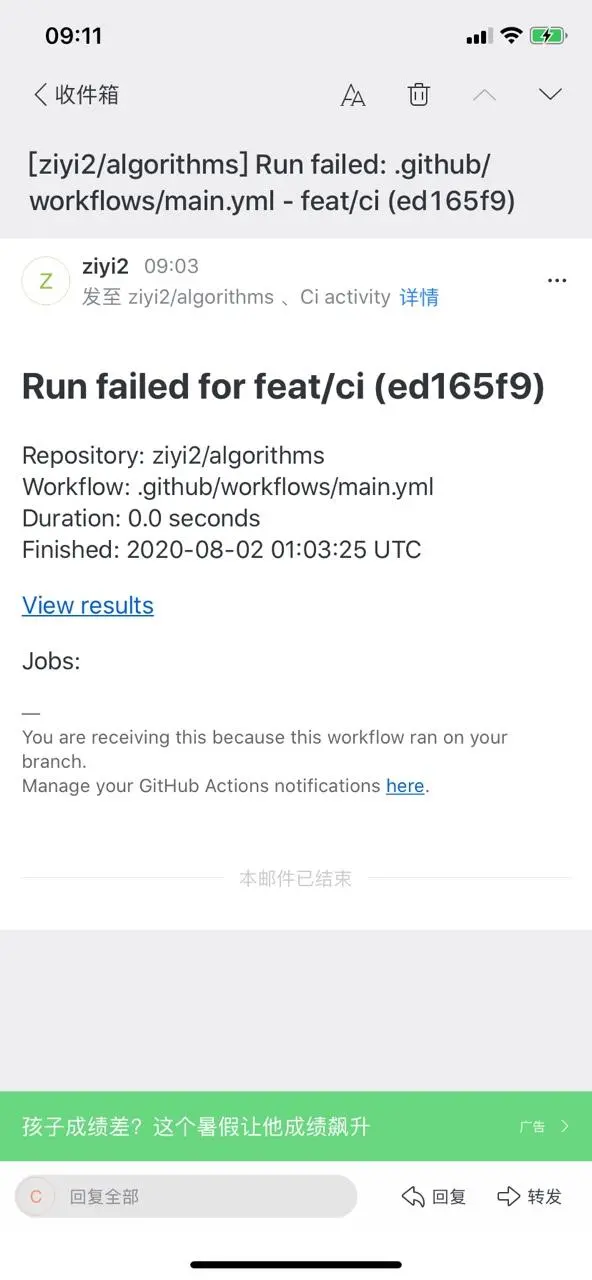
正在構(gòu)建或者構(gòu)建完成后可查看每個構(gòu)建的信息,如果初次構(gòu)建失敗則可以通過構(gòu)建信息找出失敗原因,并重新修改構(gòu)建配置嘗試再次構(gòu)建。除此之外,每次構(gòu)建失敗 Github 都會通過郵件的形式進行通知:
如果構(gòu)建成功,則每次你推送新的代碼后,Github 服務(wù)會進行一系列流程并自動更新靜態(tài)資源站點。
總結(jié)
希望大家看完這篇文檔之后如果想使用其中某些工具能夠養(yǎng)成以下一些習慣:
- 通篇閱讀工具的文檔,了解相同功能的不同工具的差異點
通篇閱讀工具對應(yīng)的官方 Github README 文檔以及官方站點文檔,了解該工具設(shè)計的核心哲學、核心功能、解決什么核心問題。前端的工具百花齊放,同樣的功能可能可以采用多種不同的工具實現(xiàn)。如果想要在項目中使用適當?shù)墓ぞ撸偷弥肋@些工具的差異。完整的閱讀相應(yīng)的官方文檔,有助于你理解各自的核心功能和差異。
- 在調(diào)研了各個工具的差異之后,選擇認為合適的工具進行實踐
在實踐的過程中你會對該工具的使用越來越熟悉。此時如果遇到一些問題或者想要實現(xiàn)某些功能,在通篇閱讀文檔的基礎(chǔ)上會變得相對容易。當然如果遇到一些報錯信息無法解決,此時第一時間應(yīng)該是搜索當前工具所對應(yīng)的 Github Issues。除此之外,你也可以根據(jù)錯誤的堆棧信息追蹤工具的源碼,了解源碼之后可能會對錯誤信息產(chǎn)生的原因更加清晰。
- 在完成以上兩步之后,你應(yīng)該總結(jié)工具的使用技巧啦,此時在此通讀工具文檔可能會產(chǎn)生不一樣的收獲


