

前言
在頭條創作了一個月左右的時間,收獲了50+粉絲,很是開心,我會把數據結構與算法的文章更新到底,第一次看我文章的同仁如果覺得不錯的話就關注一下我哦,你的支持就是我創作的動力。
一、什么是跳表
我們在之前介紹了十分優秀的二分查找算法,但是它只能作用于有序數組上,查找起來比較方便,但是數組中插入和刪除元素是比較麻煩的;那么有沒有辦法讓二分查找也能作用于有序鏈表上,從而達到查找、插入和刪除元素都十分的快速呢?
對于普通的有序列表來說,當然不能實現我們的目標,如下查找的時間復雜度為O(n);

原始有序單鏈表
我們可以基于原始鏈表建立一個 索引層,比如每兩個節點提取一個節點到索引層:
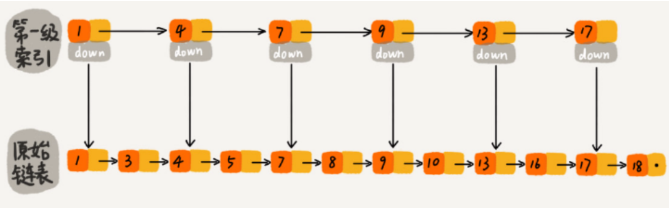
帶一級索引的跳表
如此,兩種數據結構我們查找元素16的比較次數分別為10次和8次,確實能提高查詢速度;我們更近一步,再次建立第二級索引:
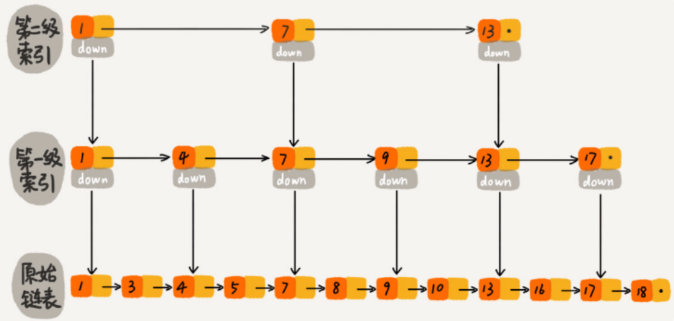
帶二級索引的跳表 帶二級索引的跳表
此時查找元素16比較的次數只需要比較7次即可;
如果在大數據量的有序鏈表中,我們建立很多層索引,使得最高層索引只有兩個節點,那么就實現了類似二分查找的算法思想,此時這種數據結構就被成為跳表。
二、跳表性能分析
2.1 時間復雜度
假設有序鏈表總節點個數為n,我們建立索引時每兩個節點提取一個索引節點;那么第一級索引共有n/2個節點;
第k級索引共有(n/2^k)個節點,假設k為最高級索引,為2個節點,那么2=(n/2^k),n=2(k+1),k=logn-1,如果原始鏈表也算進去的話,k=logn正好是整個數據結構的高度。
假設每一層需要遍歷m個節點,那么時間復雜度就可以表示為O(mlogn),但是推斷m是常量級別的,因此可以忽略,那么整個查找過程時間復雜度就是O(logn),竟然和二分查找是一樣的高效!
2.2 空間復雜度
第一級索引需要n/2個節點,第二級需要n/2^2個節點,依次類推,第k級索引需要的節點個數為n/2^k,這正好是一個等比數列,等比數列求和的結果是n-2,所以空間復雜度為O(n),這是一個以空間換時間的策略;
我們可以每3個節點或者每4個節點往上提取一個索引節點,如此可以適當減少需要的額外空間,但是空間復雜度仍然為O(n);如果有序鏈表存儲的是大對象,那么索引節點中無需存放整個大對象,只要存儲對象的指針即可,所以此時空間復雜度就顯得不那么重要了;
2.3 跳表的插入和刪除
跳表因為是順序鏈表,所以真正插入和刪除的時間復雜度都是O(1),但是找到需要插入節點的位置或者找到待刪除的節點時間復雜度為O(logn);
跳表在刪除的時候,除了需要刪除原始有序鏈表中的節點,還需要同步刪除k級索引中的全部該索引節點;
跳表在插入元素式,極端情況下會導致兩個索引節點中存在大量的原始節點,時間效率極有可能會退化為單鏈表的O(n),所以需要動態地平衡和更新k級索引節點;
三、跳表使用場景
redis在存儲有序集合的時候就用到了跳表+散列表的數據結構,跳表和紅黑樹相比,插入、刪除、查找的時間復雜度相同,但是跳表在按照區間查找時明顯具有效率優勢,而且跳表實現起來比紅黑樹要簡單易懂,不容易出錯。
紅黑樹等常用數據結構在程序語言中都是封裝好的,我們想用的話直接拿來用即可,比如HashMap,但是跳表卻沒有對應的封裝好的數據結構,想用的話開發者必須自己去實現。
四、代碼實現跳表Skiplist以及優化
代碼來源于極客時間《數據結構和算法之美》
github地址:
https://github.com/wangzheng0822/algo(數據結構和算法必知必會的50個代碼實現)
4.1 作者王爭給出的跳表實現方式
/**
 * 跳表的一種實現方法。
 * 跳表中存儲的是正整數,并且存儲的是不重復的。
 *
 */
public class SkipList {

  private static final float SKIPLIST_P = 0.5f;
  private static final int MAX_LEVEL = 16;

  private int levelCount = 1;

  private Node head = new Node();  // 帶頭鏈表

  public Node find(int value) {
    Node p = head;
    for (int i = levelCount - 1; i >= 0; --i) {
      while (p.forwards[i] != null && p.forwards[i].data < value) {
        p = p.forwards[i];
      }
    }

    if (p.forwards[0] != null && p.forwards[0].data == value) {
      return p.forwards[0];
    } else {
      return null;
    }
  }

  public void insert(int value) {
    int level = randomLevel();
    Node newNode = new Node();
    newNode.data = value;
    newNode.maxLevel = level;
    Node update[] = new Node[level];
    for (int i = 0; i < level; ++i) {
      update[i] = head;
    }

    // record every level largest value which smaller than insert value in update[]
    Node p = head;
    for (int i = level - 1; i >= 0; --i) {
      while (p.forwards[i] != null && p.forwards[i].data < value) {
        p = p.forwards[i];
      }
      update[i] = p;// use update save node in search path
    }

    // in search path node next node become new node forwords(next)
    for (int i = 0; i < level; ++i) {
      newNode.forwards[i] = update[i].forwards[i];
      update[i].forwards[i] = newNode;
    }

    // update node hight
    if (levelCount < level) levelCount = level;
  }

  public void delete(int value) {
    Node[] update = new Node[levelCount];
    Node p = head;
    for (int i = levelCount - 1; i >= 0; --i) {
      while (p.forwards[i] != null && p.forwards[i].data < value) {
        p = p.forwards[i];
      }
      update[i] = p;
    }

    if (p.forwards[0] != null && p.forwards[0].data == value) {
      for (int i = levelCount - 1; i >= 0; --i) {
        if (update[i].forwards[i] != null && update[i].forwards[i].data == value) {
          update[i].forwards[i] = update[i].forwards[i].forwards[i];
        }
      }
    }

    while (levelCount>1&&head.forwards[levelCount]==null){
      levelCount--;
    }

  }

  // 理論來講,一級索引中元素個數應該占原始數據的 50%,二級索引中元素個數占 25%,三級索引12.5% ,一直到最頂層。
  // 因為這里每一層的晉升概率是 50%。對于每一個新插入的節點,都需要調用 randomLevel 生成一個合理的層數。
  // 該 randomLevel 方法會隨機生成 1~MAX_LEVEL 之間的數,且 :
  //        50%的概率返回 1
  //        25%的概率返回 2
  //      12.5%的概率返回 3 ...
  private int randomLevel() {
    int level = 1;

    while (Math.random() < SKIPLIST_P && level < MAX_LEVEL)
      level += 1;
    return level;
  }

  public void printAll() {
    Node p = head;
    while (p.forwards[0] != null) {
      System.out.print(p.forwards[0] + " ");
      p = p.forwards[0];
    }
    System.out.println();
  }

  public class Node {
    private int data = -1;
    private Node forwards[] = new Node[MAX_LEVEL];
    private int maxLevel = 0;

    @Override
    public String toString() {
      StringBuilder builder = new StringBuilder();
      builder.Append("{ data: ");
      builder.append(data);
      builder.append("; levels: ");
      builder.append(maxLevel);
      builder.append(" }");

      return builder.toString();
    }
  }

}
4.2 作者ldb基于王爭的代碼給出的優化
import JAVA.util.Random;

/**
 * 1,跳表的一種實現方法,用于練習。跳表中存儲的是正整數,并且存儲的是不重復的。
 * 2,本類是參考作者zheng ,自己學習,優化了添加方法
 * 3,看完這個,我覺得再看ConcurrentSkipListMap 源碼,會有很大收獲
 */
public class SkipList2 {

    private static final int MAX_LEVEL = 16;
    private int levelCount = 1;

    /**
     * 帶頭鏈表
     */
    private Node head = new Node(MAX_LEVEL);
    private Random r = new Random();

    public Node find(int value) {
        Node p = head;
        // 從最大層開始查找,找到前一節點,通過--i,移動到下層再開始查找
        for (int i = levelCount - 1; i >= 0; --i) {
            while (p.forwards[i] != null && p.forwards[i].data < value) {
                // 找到前一節點
                p = p.forwards[i];
            }
        }

        if (p.forwards[0] != null && p.forwards[0].data == value) {
            return p.forwards[0];
        } else {
            return null;
        }
    }

    /**
     * 優化了作者zheng的插入方法
     *
     * @param value 值
     */
    public void insert(int value) {
        int level = head.forwards[0] == null ? 1 : randomLevel();
        // 每次只增加一層,如果條件滿足
        if (level > levelCount) {
            level = ++levelCount;
        }
        Node newNode = new Node(level);
        newNode.data = value;
        Node update[] = new Node[level];
        for (int i = 0; i < level; ++i) {
            update[i] = head;
        }

        Node p = head;
        // 從最大層開始查找,找到前一節點,通過--i,移動到下層再開始查找
        for (int i = levelCount - 1; i >= 0; --i) {
            while (p.forwards[i] != null && p.forwards[i].data < value) {
                // 找到前一節點
                p = p.forwards[i];
            }
            // levelCount 會 > level,所以加上判斷
            if (level > i) {
                update[i] = p;
            }

        }
        for (int i = 0; i < level; ++i) {
            newNode.forwards[i] = update[i].forwards[i];
            update[i].forwards[i] = newNode;
        }

    }

    /**
     * 優化了作者zheng的插入方法2
     *
     * @param value 值
     */
    public void insert2(int value) {
        int level = head.forwards[0] == null ? 1 : randomLevel();
        // 每次只增加一層,如果條件滿足
        if (level > levelCount) {
            level = ++levelCount;
        }
        Node newNode = new Node(level);
        newNode.data = value;
        Node p = head;
        // 從最大層開始查找,找到前一節點,通過--i,移動到下層再開始查找
        for (int i = levelCount - 1; i >= 0; --i) {
            while (p.forwards[i] != null && p.forwards[i].data < value) {
                // 找到前一節點
                p = p.forwards[i];
            }
            // levelCount 會 > level,所以加上判斷
            if (level > i) {
                if (p.forwards[i] == null) {
                    p.forwards[i] = newNode;
                } else {
                    Node next = p.forwards[i];
                    p.forwards[i] = newNode;
                    newNode.forwards[i] = next;
                }
            }

        }

    }

    /**
     * 作者zheng的插入方法,未優化前,優化后參見上面insert()
     *
     * @param value
     * @param level 0 表示隨機層數,不為0,表示指定層數,指定層數
     *              可以讓每次打印結果不變動,這里是為了便于學習理解
     */
    public void insert(int value, int level) {
        // 隨機一個層數
        if (level == 0) {
            level = randomLevel();
        }
        // 創建新節點
        Node newNode = new Node(level);
        newNode.data = value;
        // 表示從最大層到低層,都要有節點數據
        newNode.maxLevel = level;
        // 記錄要更新的層數,表示新節點要更新到哪幾層
        Node update[] = new Node[level];
        for (int i = 0; i < level; ++i) {
            update[i] = head;
        }

        /**
         *
         * 1,說明:層是從下到上的,這里最下層編號是0,最上層編號是15
         * 2,這里沒有從已有數據最大層(編號最大)開始找,(而是隨機層的最大層)導致有些問題。
         *    如果數據量為1億,隨機level=1 ,那么插入時間復雜度為O(n)
         */
        Node p = head;
        for (int i = level - 1; i >= 0; --i) {
            while (p.forwards[i] != null && p.forwards[i].data < value) {
                p = p.forwards[i];
            }
            // 這里update[i]表示當前層節點的前一節點,因為要找到前一節點,才好插入數據
            update[i] = p;
        }

        // 將每一層節點和后面節點關聯
        for (int i = 0; i < level; ++i) {
            // 記錄當前層節點后面節點指針
            newNode.forwards[i] = update[i].forwards[i];
            // 前一個節點的指針,指向當前節點
            update[i].forwards[i] = newNode;
        }

        // 更新層高
        if (levelCount < level) levelCount = level;
    }

    public void delete(int value) {
        Node[] update = new Node[levelCount];
        Node p = head;
        for (int i = levelCount - 1; i >= 0; --i) {
            while (p.forwards[i] != null && p.forwards[i].data < value) {
                p = p.forwards[i];
            }
            update[i] = p;
        }

        if (p.forwards[0] != null && p.forwards[0].data == value) {
            for (int i = levelCount - 1; i >= 0; --i) {
                if (update[i].forwards[i] != null && update[i].forwards[i].data == value) {
                    update[i].forwards[i] = update[i].forwards[i].forwards[i];
                }
            }
        }
    }

    /**
     * 隨機 level 次,如果是奇數層數 +1,防止偽隨機
     *
     * @return
     */
    private int randomLevel() {
        int level = 1;
        for (int i = 1; i < MAX_LEVEL; ++i) {
            if (r.nextInt() % 2 == 1) {
                level++;
            }
        }
        return level;
    }

    /**
     * 打印每個節點數據和最大層數
     */
    public void printAll() {
        Node p = head;
        while (p.forwards[0] != null) {
            System.out.print(p.forwards[0] + " ");
            p = p.forwards[0];
        }
        System.out.println();
    }

    /**
     * 打印所有數據
     */
    public void printAll_beautiful() {
        Node p = head;
        Node[] c = p.forwards;
        Node[] d = c;
        int maxLevel = c.length;
        for (int i = maxLevel - 1; i >= 0; i--) {
            do {
                System.out.print((d[i] != null ? d[i].data : null) + ":" + i + "-------");
            } while (d[i] != null && (d = d[i].forwards)[i] != null);
            System.out.println();
            d = c;
        }
    }

    /**
     * 跳表的節點,每個節點記錄了當前節點數據和所在層數數據
     */
    public class Node {
        private int data = -1;
        /**
         * 表示當前節點位置的下一個節點所有層的數據,從上層切換到下層,就是數組下標-1,
         * forwards[3]表示當前節點在第三層的下一個節點。
         */
        private Node forwards[];

        /**
         * 這個值其實可以不用,看優化insert()
         */
        private int maxLevel = 0;

        public Node(int level) {
            forwards = new Node[level];
        }

        @Override
        public String toString() {
            StringBuilder builder = new StringBuilder();
            builder.append("{ data: ");
            builder.append(data);
            builder.append("; levels: ");
            builder.append(maxLevel);
            builder.append(" }");
            return builder.toString();
        }
    }

    public static void main(String[] args) {
        SkipList2 list = new SkipList2();
        list.insert(1, 3);
        list.insert(2, 3);
        list.insert(3, 2);
        list.insert(4, 4);
        list.insert(5, 10);
        list.insert(6, 4);
        list.insert(8, 5);
        list.insert(7, 4);
        list.printAll_beautiful();
        list.printAll();
        /**
         * 結果如下:
         * null:15-------
         * null:14-------
         * null:13-------
         * null:12-------
         * null:11-------
         * null:10-------
         * 5:9-------
         * 5:8-------
         * 5:7-------
         * 5:6-------
         * 5:5-------
         * 5:4-------
         * 8:4-------
         * 4:3-------5:3-------6:3-------7:3-------8:3-------
         * 1:2-------2:2-------          4:2-------5:2-------6:2-------7:2-------8:2-------
         * 1:1-------2:1-------3:1-------4:1-------5:1-------6:1-------7:1-------8:1-------
         * 1:0-------2:0-------3:0-------4:0-------5:0-------6:0-------7:0-------8:0-------
         * { data: 1; levels: 3 } { data: 2; levels: 3 } { data: 3; levels: 2 } { data: 4; levels: 4 }
         * { data: 5; levels: 10 } { data: 6; levels: 4 } { data: 7; levels: 4 } { data: 8; levels: 5 }
         */
        // 優化后insert()

        SkipList2 list2 = new SkipList2();
        list2.insert2(1);
        list2.insert2(2);
        list2.insert2(6);
        list2.insert2(7);
        list2.insert2(8);
        list2.insert2(3);
        list2.insert2(4);
        list2.insert2(5);
        System.out.println();
        list2.printAll_beautiful();


    }

}


