
來源 | OSCHINA 社區(qū)
作者 | 華為云開發(fā)者聯(lián)盟-磚業(yè)洋_
在本文中,我們深入探討了 Spring 框架中的屬性注入技術,包括 setter 注入、構造器注入、注解式屬性注入,以及使用 SpEL 表達式進行屬性注入。我們通過 XML 和注解兩種方式,詳細講解了如何進行屬性注入,并給出了完整的代碼示例。無論你是 Spring 新手,還是有一定經(jīng)驗的開發(fā)者,本文都將幫助你理解并掌握 Spring 中的屬性注入技術。
1. setter 屬性注入1.1 使用 XML 進行 setter 方法注入
我們在前面的文章中已經(jīng)使用過 XML 進行 setter 方法的屬性注入了,下面讓我們再來回顧一下:
<bean id= "userSetter"class= "com.example.demo.bean.User">
< propertyname= "username"value= "example-username-setter"/>
< propertyname= "age"value= "25"/>
</ bean>
1.2 使用 @Bean 注解進行 setter 方法注入
我們在前面的文章中也學習過如何在 bean 創(chuàng)建時通過編程方式設置屬性:
@Bean
publicUser user{
User user = newUser;
user.setUsername( "example-username-anno-setter");
user.setAge( 25);
returnuser;
}
1.3 setter 方法注入完整代碼示例
- 使用 XML 進行 setter 方法注入
首先,我們需要創(chuàng)建一個 User 類,并在其中包含 username 和 age 兩個屬性,以及相應的 getter、setter 方法和構造器。
publicclassUser{
privateString username;
privateInteger age;
publicUser{
}
// 為了節(jié)省篇幅,getter和setter方法省略......
@Override
publicString toString{
return"User{username='"+ username + "', age="+ age + "}";
}
}
對于 XML 方式的 setter 注入和構造器注入,我們需要創(chuàng)建一個配置文件,比如叫 ApplicationContext.xml。
< beansxmlns= "http://www.springframework.org/schema/beans"
xmlns:xsi= "http://www.w3.org/2001/XMLSchema-instance"
xsi:schemaLocation= "http://www.springframework.org/schema/beans
http://www.springframework.org/schema/beans/spring-beans.xsd" >
<!-- setter方法注入 -->
< beanid= "userSetter"class= "com.example.demo.bean.User">
< propertyname= "username"value= "example-username-setter"/>
< propertyname= "age"value= "25"/>
</ bean>
</ beans>
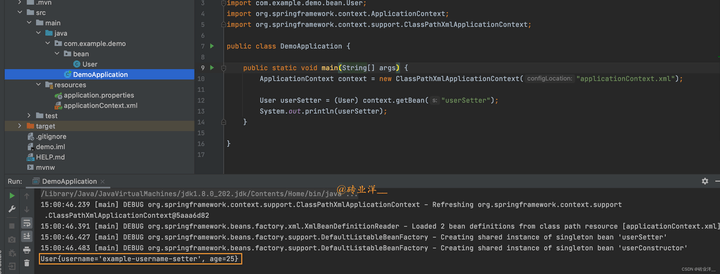
然后,我們需要創(chuàng)建一個 DemoApplication 類,使用 ApplicationContext 來加載配置文件并獲取 Bean:
importcom.example.demo.bean.User;
importorg.springframework.context.ApplicationContext;
importorg.springframework.context.support.ClassPathXmlApplicationContext;
publicclassDemoApplication{
publicstaticvoid mAIn( String[] args) {
ApplicationContextcontext = new ClassPathXmlApplicationContext( "applicationContext.xml");
UseruserSetter = ( User) context.getBean( "userSetter");
System.out. println(userSetter);
}
}
運行結果如下:
- 使用 @Bean 注解進行 setter 方法注入
我們需要創(chuàng)建一個配置類,例如叫 AppConfig.JAVA:
importorg.springframework.context. annotation.Bean;
importorg.springframework.context. annotation.Configuration;
@Configuration
publicclassAppConfig{
@Bean
publicUser userSetter {
User user = new User;
user.setUsername( "example-username-anno-setter");
user.setAge( 25);
returnuser;
}
}
使用 @Bean 注解來定義 Bean。每個 @Bean 方法對應于 XML 配置中的一個 <bean> 元素。這個方法的名稱就是 Bean 的 id,方法的返回值就是 Bean 的類型
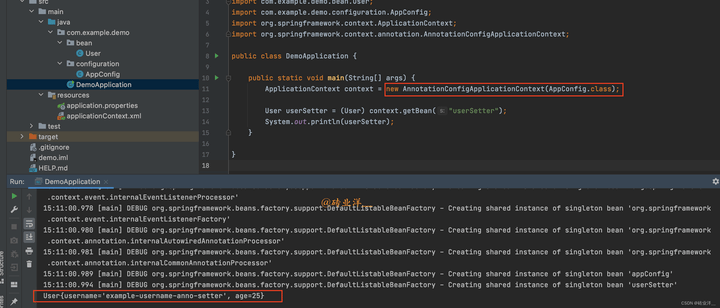
然后修改主程序,這里使用 AnnotationConfigApplicationContext 來創(chuàng)建 Spring 的應用上下文,并加載配置類。Spring 會自動從配置類中獲取所有的 Bean 定義,并創(chuàng)建相應的 Bean 實例。
packagecom.example.demo;
importcom.example.demo.bean.User;
importcom.example.demo.configuration.AppConfig;
importorg.springframework.context.ApplicationContext;
importorg.springframework.context.annotation.AnnotationConfigApplicationContext;
publicclassDemoApplication{
publicstaticvoidmain(String[] args){
ApplicationContext context = newAnnotationConfigApplicationContext(AppConfig . class) ;
User userSetter = (User) context.getBean( "userSetter");
System.out.println(userSetter);
}
}
運行結果如下
注意:XML 配置方式已經(jīng)相對陳舊,而且在 Spring Boot 項目中,主流的做法是使用注解和 Java 配置方式。對于 setter 注入,有時會引發(fā)循環(huán)依賴的問題。在 Spring 中,可以使用構造器注入來避免這種情況,這里了解即可。
2. 構造器注入
setter 注入是一種在對象被實例化之后(通過調用無參構造器創(chuàng)建實例)再通過 setter 方法注入依賴的方式。構造器注入則是在創(chuàng)建對象實例的時候就通過構造器參數(shù)來注入依賴。
為了演示構造器注入,我們需要給 User 添加一個全參數(shù)構造器:
publicUser(String username, Integer age) {
this.username = username;
this.age = age;
}
添加這個構造器后,Java 不再提供默認的無參構造器,這會導致我們之前的 <bean> 標簽創(chuàng)建時失敗,因為它找不到默認的構造器。
2.1 使用 XML 進行構造器注入
我們可以在 <bean> 標簽內部聲明一個子標簽:constructor-arg。它用于指定構造器的參數(shù),來進行屬性注入。constructor-arg 標簽的編寫規(guī)則如下:
<bean id= "userConstructor"class= "com.example.demo.bean.User">
< constructor-argindex= "0"value= "example-username-constructor"/>
< constructor-argindex= "1"value= "25"/>
</ bean>
index 屬性表示構造函數(shù)參數(shù)的位置,它的值是一個非負整數(shù),其中 0 表示第一個參數(shù),1 表示第二個參數(shù),以此類推。雖然 value 屬性的值總是一個字符串,但是 Spring 會嘗試將它轉換為構造函數(shù)參數(shù)所需的類型。例如構造函數(shù)的第二個參數(shù)是 int 類型,那么 Spring 會嘗試將字符串 "25" 轉換為整數(shù) 25。
使用 index 屬性來指定構造函數(shù)參數(shù)的位置在大多數(shù)情況下是可以的,但是如果構造函數(shù)的參數(shù)數(shù)量或者順序發(fā)生了改變,就可能會出錯。另外一種更為可靠的方式是使用 name 屬性來指定參數(shù)的名稱,如:
<bean id= "userConstructor"class= "com.example.demo.bean.User">
< constructor-argname= "username"value= "example-username-constructor"/>
< constructor-argname= "age"value= "25"/>
</ bean>
這樣無論參數(shù)的順序如何,只要參數(shù)名稱不變,就不會出錯。
2.2 使用 @Bean 注解進行構造器屬性注入
在注解驅動的 bean 注冊中,我們也可以直接使用編程方式賦值:
@Bean
publicUser user{
returnnewUser( "example-username-anno-constructor", 25);
}
2.3 構造器注入的完整代碼示例
- 使用 XML 進行構造器注入
首先,我們需要創(chuàng)建一個 User 類,并在其中包含 username 和 age 兩個屬性,以及相應的 getter、setter 方法和構造器。
publicclassUser{
privateString username;
privateInteger age;
publicUser{
}
publicUser(String username, Integer age){
this.username = username;
this.age = age;
}
// 為了節(jié)省篇幅,getter和setter方法省略......
@Override
publicString toString{
return"User{username='"+ username + "', age="+ age + "}";
}
}
對于 XML 方式的構造器注入,我們需要創(chuàng)建一個配置文件,比如叫 applicationContext.xml,這里保留 setter 注入方便大家對比
< beansxmlns= "http://www.springframework.org/schema/beans"
xmlns:xsi= "http://www.w3.org/2001/XMLSchema-instance"
xsi:schemaLocation= "http://www.springframework.org/schema/beans
http://www.springframework.org/schema/beans/spring-beans.xsd" >
<!-- setter方法注入 -->
<!-- setter方法注入 -->
<!-- <bean id="userSetter" class="com.example.demo.bean.User">-->
<!-- <property name="username" value="example-username-setter"/>-->
<!-- <property name="age" value="25"/>-->
<!-- </bean>-->
<!-- 構造器注入 -->
< beanid= "userConstructor"class= "com.example.demo.bean.User">
< constructor-argname= "username"value= "example-username-constructor"/>
< constructor-argname= "age"value= "25"/>
</ bean>
</ beans>
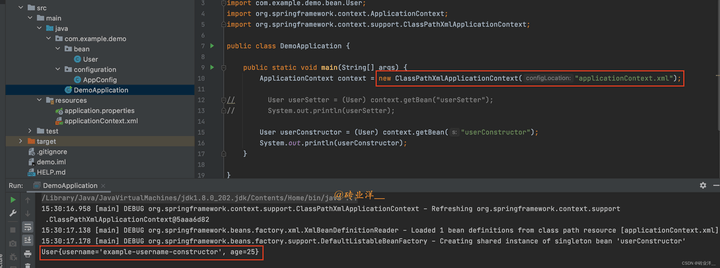
然后,我們需要創(chuàng)建一個 DemoApplication 類,使用 ApplicationContext 來加載配置文件并獲取 Bean:
packagecom.example.demo;
importcom.example.demo.bean.User;
importorg.springframework.context.ApplicationContext;
importorg.springframework.context.support.ClassPathXmlApplicationContext;
publicclassDemoApplication{
publicstaticvoidmain(String[] args){
ApplicationContext context = newClassPathXmlApplicationContext( "applicationContext.xml");
// User userSetter = (User) context.getBean("userSetter");
// System.out.println(userSetter);
User userConstructor = (User) context.getBean( "userConstructor");
System.out.println(userConstructor);
}
}
運行結果如下:
- 使用 @Bean 注解進行構造器屬性注入
我們需要創(chuàng)建一個配置類,例如叫 AppConfig.java:
importcom.example.demo.bean.User;
importorg.springframework.context. annotation.Bean;
importorg.springframework.context. annotation.Configuration;
@Configuration
publicclassAppConfig{
// @Bean
// public User userSetter {
// User user = new User;
// user.setUsername("example-username-anno-setter");
// user.setAge(25);
// return user;
// }
@Bean
publicUser userConstructor {
returnnew User( "example-username-anno-constructor", 25);
}
}
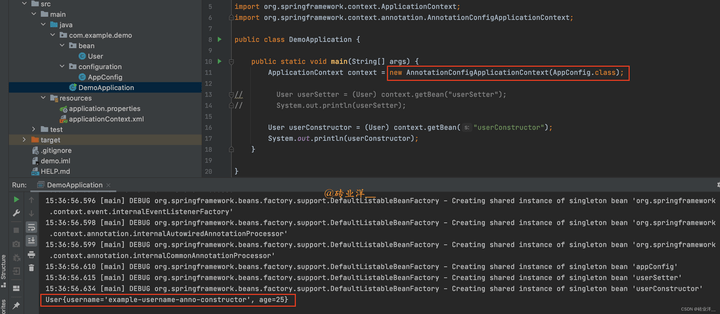
同樣,我們需要創(chuàng)建一個 DemoApplication 類,使用 AnnotationConfigApplicationContext 來加載配置類并獲取 Bean:
importcom.example.demo.bean.User;
importcom.example.demo.configuration.AppConfig;
importorg.springframework.context.ApplicationContext;
importorg.springframework.context.annotation.AnnotationConfigApplicationContext;
publicclassDemoApplication{
publicstaticvoidmain(String[] args){
ApplicationContext context = newAnnotationConfigApplicationContext(AppConfig . class) ;
// User userSetter = (User) context.getBean("userSetter");
// System.out.println(userSetter);
User userConstructor = (User) context.getBean( "userConstructor");
System.out.println(userConstructor);
}
}
運行結果:
注意:如果在類中同時使用構造器注入和 setter 注入,需要注意它們注入的順序:先進行構造器注入,然后是 setter 注入。
3. 注解式屬性注入
上面我們已經(jīng)說過注解式的 setter 和構造器注入。我們又是如何處理那些通過 @Component 掃描而注冊的 bean 的屬性的呢?我們來仔細說說這個問題,同時展示如何在 xml 中進行相同的操作。
3.1 @Value 注解式屬性注入的應用
首先,讓我們從最簡單的屬性注入方法:@Value 開始。創(chuàng)建一個新的 White 類,并聲明一些字段,但是這次我們不會設置 setter 方法:
@Component
publicclassWhite{
@Value( "white-value-annotation")
privateString title;
@Value( "1")
privateInteger rank;
@Override
publicString toString {
return"White{"+ "title='"+ title + '''+ ", rank="+ rank + '}';
}
}
要實現(xiàn)注解式屬性注入,我們可以直接在需要注入的字段上添加 @Value 注解:
@ Value(" white- value- annotation")
private String title;
@ Value(" 1")
private Integer rank;
要注意的是,如果使用 @Value 注解來注入一個不存在的屬性,那么應用程序會在啟動時拋出異常。
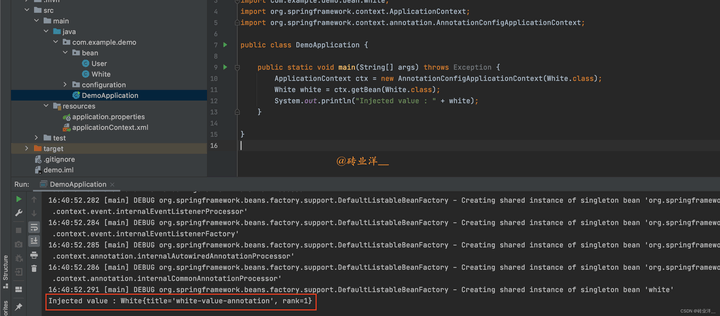
然后,我們將通過組件掃描方式將這個 White 類掃描到 IOC 容器中,并將其取出并打印:
publicclassDemoApplication{
publicstaticvoidmain(String[] args)throwsException {
ApplicationContext ctx = newAnnotationConfigApplicationContext(White . class) ;
White white = ctx.getBean(White . class) ;
System.out.println( "Injected value : "+ white);
}
}
運行 main 方法會看到 White 的字段已經(jīng)成功注入:
Injectedvalue : White{
title= 'white-value-annotation', rank=1}
3.2 引入外部配置文件 @PropertySource
如果我們需要在 Spring 中使用 properties 文件,我們應該怎么辦呢?Spring 考慮到了這一點,并擴展了一個用于導入外部配置文件的注解:@PropertySource。
- 創(chuàng)建 Bean 和配置文件
創(chuàng)建一個新的 Blue 類,其結構與 White 類完全相同。然后在項目的 resources 目錄下創(chuàng)建一個新的 blue.properties 文件,用于存儲 Blue 類的屬性配置:
blue.title=blue-value-properties
blue.rank= 2
- 引入配置文件
使用 @PropertySource 注解將 properties 文件導入到配置類:
@Configuration
@ComponentScan( "com.example")
@PropertySource( "classpath:blue.properties")
public class InjectValueConfiguration {
}
這個 blue.properties 文件是一個鍵值對的列表,Spring 將這些鍵值對加載到 Environment 中,我們可以通過 @Value 注解或者 Environment 類的方法來獲取這些屬性值。
@Value 注解和 Environment 類都可以用于讀取 Spring 上下文中的屬性值。這些屬性值可能來自于多個不同的源,包括但不限于:
- Spring Boot 的默認配置文件(application.properties 或 application.yml)。
- 通過 @PropertySource 注解加載的屬性文件。
- 系統(tǒng)環(huán)境變量。
- Java 系統(tǒng)屬性(可以通過 -D 命令行參數(shù)設置)。
如果你想通過 @Value 注解來獲取屬性值,如下:
@Component
publicclassBlueConfig{
@Value( " ${blue.title}" )
privateString title;
@Value( " ${blue.rank}" )
privateint rank;
// getters and setters...
}
在 Spring 應用中使用 @PropertySource 注解來加載一個 .properties 文件時,這個文件中的所有配置項都會被讀取,并存儲在一個內部的 Map 結構中。這個 Map 的鍵是配置項的名稱,值是配置項的值。Spring 中的一些內置配置項也會被添加到這個 Map 中。
當我們使用 ${...}`占位符語法來引用一個配置項時,`Spring`會查找這個`Map`,取出與占位符名稱相應的配置項的值。例如有一個配置項`blue.title=blue-value-properties`,我們可以在代碼中使用`${blue.title} 占位符來引用這個配置項的值。
如果想通過 Environment 類的方法來獲取屬性值,可以像下面這樣做:
@Component
publicclassSomeComponent{
@Autowired
privateEnvironment env;
publicvoidsomeMethod{
String title = env.getProperty( "blue.title");
intrank = Integer.parseInt(env.getProperty( "blue.rank"));
// ...
}
}
在上述代碼中,Environment 類的 getProperty 方法用于獲取屬性值。注意,getProperty 方法返回的是 String,所以如果屬性是非字符串類型(如 int),則需要將獲取的屬性值轉換為適當?shù)念愋汀?/p>
注意: @PropertySource無法加載YAML格式的文件,只能加載 properties 格式的文件。如果需要加載 YAML 格式的文件,而且使用的是 Spring Boot 框架,那么可以使用 @ConfigurationProperties 或 @Value 注解。例如以下的 YAML 文件:
application.yml
appTest:
name:MyApp
version:1.0.0
可以使用 @ConfigurationProperties 來加載這些屬性:
@Configuration
@ConfigurationProperties(prefix = "appTest")
public class AppConfig {
privateStringname;
privateStringversion;
// getters and setters...
}
@ConfigurationProperties 注解主要用于指定配置屬性的前綴,@ConfigurationProperties 注解本身并不直接指定配置文件的位置, 而是由 Spring Boot 的自動配置機制處理的。
這樣,name 字段就會被自動綁定到 appTest.name 配置屬性,version 字段就會被自動綁定到 appTest.version 配置屬性。
默認情況下,Spring Boot 會在啟動時自動加載 src/main/resources 目錄下的 application.properties 或 application.yml 文件。我們可以通過設置 spring.config.name 和 spring.config.location 屬性來改變默認的配置文件名或位置。
注意:@ConfigurationProperties 注解需要配合 @EnableConfigurationProperties 注解或 @Configuration 注解使用,以確保 Spring 能夠發(fā)現(xiàn)并處理這些注解。
或者,你也可以使用 @Value 注解來加載這些屬性:
@Component
publicclassAppConfig{
@Value( " ${appTest.name}" )
privateString name;
@Value( " ${appTest.version}" )
privateString version;
// getters and setters...
}
- Blue 類的屬性注入
對于 properties 類型的屬性,我們這里選擇 @Value 注解和占位符來注入屬性:
@Value( " ${blue.title}" )
privateString title;
@Value( " ${blue.rank}" )
privateInteger rank;
如果你熟悉 jsp 的 el 表達式,會發(fā)現(xiàn)這和它非常相似!
- 測試啟動類
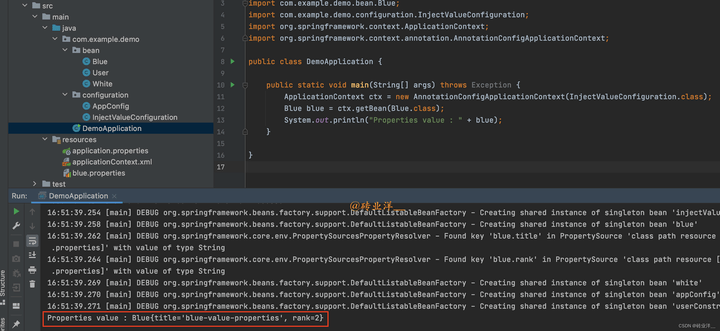
修改啟動類,將配置類引入,然后取出并打印 Blue:
publicstaticvoidmain(String[] args)throwsException {
ApplicationContext ctx = newAnnotationConfigApplicationContext(InjectValueConfiguration . class) ;
Blue blue = ctx.getBean(Blue . class) ;
System.out.println( "Properties value : "+ blue);
}
運行 main 方法會看到控制臺已經(jīng)成功打印出了配置文件的屬性:
Propertiesvalue : Blue{
title= 'blue-value-properties', rank=2}
3.3 在 XML 中引入外部配置文件
在 xml 中,我們可以和 @Value 相同的方式使用占位符:
<?xml version="1.0" encoding="UTF-8"?>
< beansxmlns= "http://www.springframework.org/schema/beans"
xmlns:xsi= "http://www.w3.org/2001/XMLSchema-instance"
xsi:schemaLocation= "http://www.springframework.org/schema/beans
http://www.springframework.org/schema/beans/spring-beans.xsd
http://www.springframework.org/schema/context
http://www.springframework.org/schema/context/spring-context.xsd"
xmlns:context= "http://www.springframework.org/schema/context">
<!-- 相當于注解中的 @PropertySource("classpath:blue.properties") -->
< context:property-placeholderlocation= "classpath:blue.properties"/>
< beanclass= "com.example.demo.bean.Blue">
< propertyname= "title"value= "${blue.title}"/>
< propertyname= "rank"value= "${blue.rank}"/>
</ bean>
</ beans>
3.4 注解式屬性注入完整代碼示例
- @Value 注解式屬性注入的應用
創(chuàng)建 White 類:
packagecom.example.demo.bean;
importorg.springframework.beans.factory. annotation.Value;
importorg.springframework.stereotype.Component;
@Component
publicclassWhite{
@Value( "white-value-annotation")
privateString title;
@Value( "1")
privateInteger rank;
@Override
publicString toString {
return"White{"+ "title='"+ title + '''+ ", rank="+ rank + '}';
}
}
創(chuàng)建啟動類 InjectValueAnnotationApplication:
packagecom.example.demo;
importcom.example.demo.bean.White;
importorg.springframework.context.ApplicationContext;
importorg.springframework.context.annotation.AnnotationConfigApplicationContext;
publicclassDemoApplication{
publicstaticvoidmain(String[] args)throwsException {
ApplicationContext ctx = newAnnotationConfigApplicationContext(White . class) ;
White white = ctx.getBean(White . class) ;
System.out.println( "Injected value : "+ white);
}
}
運行結果如下:
- 引入外部配置文件 @PropertySource
創(chuàng)建 Blue 類和配置文件,沒有 setter 和 getter 方法:
packagecom.example.demo.bean;
importorg.springframework.beans.factory. annotation.Value;
importorg.springframework.stereotype.Component;
@Component
publicclassBlue{
@Value( " ${blue.title}" )
privateString title;
@Value( " ${blue.rank}" )
privateInteger rank;
@Override
publicString toString {
return"Blue{"+ "title='"+ title + '''+ ", rank="+ rank + '}';
}
}
resources 目錄下的 blue.properties 文件:
blue.title=blue-value-properties
blue.rank= 2
創(chuàng)建配置類 InjectValueConfiguration:
packagecom.example.demo.configuration;
importorg.springframework.context.annotation.ComponentScan;
importorg.springframework.context.annotation.Configuration;
importorg.springframework.context.annotation.PropertySource;
@ Configuration
@ComponentScan( "com.example")
@PropertySource( "classpath:blue.properties")
public class InjectValueConfiguration {
}
修改啟動類,引入配置類:
packagecom.example.demo;
importcom.example.demo.bean.Blue;
importcom.example.demo.configuration.InjectValueConfiguration;
importorg.springframework.context.ApplicationContext;
importorg.springframework.context.annotation.AnnotationConfigApplicationContext;
publicclassDemoApplication{
publicstaticvoidmain(String[] args)throwsException {
ApplicationContext ctx = newAnnotationConfigApplicationContext(InjectValueConfiguration . class) ;
Blue blue = ctx.getBean(Blue . class) ;
System.out.println( "Properties value : "+ blue);
}
}
運行結果如下:
- 在 xml 中引入外部配置文件
在使用 XML 配置的情況下,我們需要創(chuàng)建一個 XML 文件來替代 InjectValueConfiguration 類,我們可以先注釋掉 InjectValueConfiguration 類的所有內容
下面是相應的 XML 文件內容:
<?xml version="1.0" encoding="UTF-8"?>
< beansxmlns= "http://www.springframework.org/schema/beans"
xmlns:xsi= "http://www.w3.org/2001/XMLSchema-instance"
xsi:schemaLocation= "http://www.springframework.org/schema/beans
http://www.springframework.org/schema/beans/spring-beans.xsd
http://www.springframework.org/schema/context
http://www.springframework.org/schema/context/spring-context.xsd"
xmlns:context= "http://www.springframework.org/schema/context">
<!-- 相當于注解中的 @PropertySource("classpath:blue.properties") -->
< context:property-placeholderlocation= "classpath:blue.properties"/>
< beanclass= "com.example.demo.bean.Blue">
< propertyname= "title"value= "${blue.title}"/>
< propertyname= "rank"value= "${blue.rank}"/>
</ bean>
</ beans>
在這里我們使用了 context:property-placeholder 標簽來導入外部的 properties 文件,然后使用 ${...} 占位符語法來引用配置文件中的屬性值。這樣無論是選擇用注解方式還是 XML 方式,都可以方便地在 Spring 中使用外部配置文件。
這里還需要修改下 Blue 類,因為通過 XML 方法注入屬性需要提供相應的 setter 方法,修改后的 Blue 類如下:
packagecom.example.demo.bean;
importorg.springframework.beans.factory. annotation.Value;
importorg.springframework.stereotype.Component;
@Component
publicclassBlue{
@Value( " ${blue.title}" )
privateString title;
@Value( " ${blue.rank}" )
privateInteger rank;
publicString getTitle {
returntitle;
}
publicvoid setTitle(String title) {
this.title = title;
}
publicInteger getRank {
returnrank;
}
publicvoid setRank(Integer rank) {
this.rank = rank;
}
@Override
publicString toString {
return"Blue{"+ "title='"+ title + '''+ ", rank="+ rank + '}';
}
}
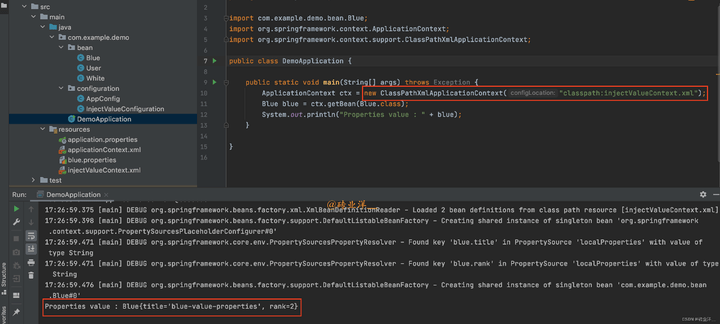
然后,我們需要修改啟動類,使用 XmlApplicationContext 代替 AnnotationConfigApplicationContext:
packagecom.example.demo;
importcom.example.demo.bean.Blue;
importorg.springframework.context.ApplicationContext;
importorg.springframework.context.annotation.ComponentScan;
importorg.springframework.context.support.ClassPathXmlApplicationContext;
@ComponentScan( "com.example")
publicclassDemoApplication{
publicstaticvoidmain(String[] args)throwsException {
ApplicationContext ctx = newClassPathXmlApplicationContext( "classpath:injectValueContext.xml");
Blue blue = ctx.getBean(Blue . class) ;
System.out.println( "Properties value : "+ blue);
}
}
運行結果如下:
4. SpEL 表達式
當我們談到屬性注入的時候,我們可能會遇到一些復雜的需求,例如我們需要引用另一個 Bean 的屬性,或者我們需要動態(tài)處理某個屬性值。這種需求無法通過使用 ${} 的占位符方式實現(xiàn),我們需要一個更強大的工具:SpEL 表達式。
Spring Expression Language(SpEL)是從 Spring 框架 3.0 開始支持的強大工具。SpEL 不僅是 Spring 框架的重要組成部分,也可以獨立使用。它的功能豐富,包括調用屬性值、屬性參數(shù)、方法調用、數(shù)組存儲以及邏輯計算等。它與開源項目 OGNL(Object-Graph Navigation Language)相似,但 SpEL 是 Spring 框架推出的,并默認內嵌在 Spring 框架中。
4.1 使用 @Value 注解和 SpEL 表達式實現(xiàn)屬性注入
SpEL 的表達式用 #{} 表示,花括號中就是我們要編寫的表達式。
我們創(chuàng)建一個 Bean,命名為 Azure,同樣地,我們聲明屬性 name 和 priority,并提供 getter 和 setter 方法以及 toString 方法。然后我們使用 @Component 注解標注它。
使用 @Value 配合 SpEL 完成屬性注入,如下:
@Component
publicclassAzure{
@Value( "#{'spel-for-azure'}")
privateString name;
@Value( "#{10}")
privateInteger priority;
}
我們修改啟動類,從 IOC 容器中獲取 Azure 并打印,可以看到屬性被成功注入:
Azure{
name= 'spel-for-azure', priority=10}
SpEL 的功能遠不止這些,它還可以獲取 IOC 容器中其他 Bean 的屬性,讓我們來展示一下。
我們已經(jīng)注冊了 Azure Bean,現(xiàn)在我們再創(chuàng)建一個 Bean,命名為 Emerald。我們按照上述方法對字段和方法進行聲明,然后使用 @Component 注解標注。
我們希望 name 屬性直接復制 Azure 的 name 屬性,而 priority 屬性則希望比 Azure 的 priority 屬性大 1,我們可以這樣編寫:
@Component
publicclassEmerald{
@Value( "#{'copy of ' + azure.name}")
privateString name;
@Value( "#{azure.priority + 1}")
privateInteger priority;
}
在 Spring 的 SpEL 中可以通過 bean 的名稱訪問到對應的 bean,并通過。操作符訪問 bean 的屬性。在這個例子中,azure 就是一個 bean 的名稱,它對應的 bean 就是 Azure 類的實例。所以,azure.name 就是訪問 Azure 類實例的 name 屬性。
如果你在一個不涉及 Spring 的環(huán)境中使用 SpEL,這個特性是不會生效的。這是因為這個特性依賴于 Spring 的 IoC 容器。
我們修改啟動類,測試運行,可以看到 Azure 的屬性已經(jīng)成功被復制:
usespel bean property : Emerald{
name= 'copy of spel-for-azure', priority= 11}
SpEL 表達式不僅可以引用對象的屬性,還可以直接引用類的常量,以及調用對象的方法。下面我們通過示例進行演示。
我們新建一個 Bean,命名為 Ivory。我們按照上述方法初始化屬性、toString 方法、注解。
假設我們有一個需求,讓 name 取 azure 屬性的前 3 個字符,priority 取 Integer 的最大值。那么我們可以使用 SpEL 這樣寫:
@Component
publicclassIvory{
@Value( "#{azure.name.substring(0, 3)}")
privateString name;
@Value( "#{T(java.lang.Integer).MAX_VALUE}")
privateInteger priority;
}
注意,直接引用類的屬性,需要在類的全限定名外面使用 T 包圍。
我們修改啟動類,測試運行,可以看到 Ivory 的屬性已經(jīng)是處理之后的值:
usespel methods : Ivory{
name= 'spe', priority= 2147483647}
4.2 在 XML 中使用 SpEL 表達式實現(xiàn)屬性注入:
<bean id= "ivory"class= "com.example.demo.bean.Ivory">
< propertyname= "name"value= "#{azure.name.substring(0, 3)}"/>
< propertyname= "priority"value= "#{T(java.lang.Integer).MAX_VALUE}"/>
</ bean>
學習 SpEL 表達式不需要花費大量的精力,掌握基礎的使用方法即可。
4.3 SpEL 表達式屬性注入完整代碼示例
- 使用 @Value 注解和 SpEL 表達式實現(xiàn)屬性注入
創(chuàng)建三個 SpEL 表達式屬性注入的 Bean:Azure.java、Emerald.java 和 Ivory.java。
Azure.java:
packagecom.example.demo.bean;
importorg.springframework.beans.factory. annotation.Value;
importorg.springframework.stereotype.Component;
@Component
publicclassAzure{
@Value( "#{'spel-for-azure'}")
privateString name;
@Value( "#{10}")
privateInteger priority;
publicString getName {
returnname;
}
publicvoid setName(String name) {
this.name = name;
}
publicInteger getPriority {
returnpriority;
}
publicvoid setPriority(Integer priority) {
this.priority = priority;
}
@Override
publicString toString {
return"Azure{"+
"name='"+ name + '''+
", priority="+ priority +
'}';
}
}
Emerald.java:
packagecom.example.demo.bean;
importorg.springframework.beans.factory. annotation.Value;
importorg.springframework.stereotype.Component;
@Component
publicclassEmerald{
@Value( "#{'copy of ' + azure.name}")
privateString name;
@Value( "#{azure.priority + 1}")
privateInteger priority;
publicString getName {
returnname;
}
publicvoid setName(String name) {
this.name = name;
}
publicInteger getPriority {
returnpriority;
}
publicvoid setPriority(Integer priority) {
this.priority = priority;
}
@Override
publicString toString {
return"Emerald{"+
"name='"+ name + '''+
", priority="+ priority +
'}';
}
}
Ivory.java:
packagecom.example.demo.bean;
importorg.springframework.beans.factory. annotation.Value;
importorg.springframework.stereotype.Component;
@Component
publicclassIvory{
@Value( "#{azure.name.substring(0, 3)}")
privateString name;
@Value( "#{T(java.lang.Integer).MAX_VALUE}")
privateInteger priority;
publicString getName {
returnname;
}
publicvoid setName(String name) {
this.name = name;
}
publicInteger getPriority {
returnpriority;
}
publicvoid setPriority(Integer priority) {
this.priority = priority;
}
@Override
publicString toString {
return"Ivory{"+
"name='"+ name + '''+
", priority="+ priority +
'}';
}
}
MyBean.java
@Component
publicclassMyBean{
@Autowired
privateAzure azure;
@Autowired
privateEmerald emerald;
@Autowired
privateIvory ivory;
publicvoid init{
System. out.println(azure);
System. out.println(emerald);
System. out.println(ivory);
}
}
MyBean 是一個用于展示如何在 Spring 中通過 SpEL 表達式來注入屬性的類,它聚合了三個對象 Azure, Emerald 和 Ivory,并通過 Spring 的依賴注入機制將這三個對象注入到了 MyBean 類的實例中
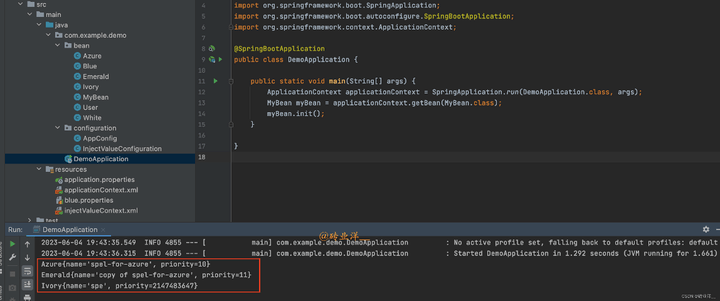
主程序 DemoApplication
@SpringBootApplication
publicclassDemoApplication{
publicstaticvoidmain(String[] args){
ApplicationContext applicationContext = SpringApplication.run(DemoApplication . class, args) ;
MyBean myBean = applicationContext.getBean(MyBean . class) ;
myBean.init;
}
}
運行結果:
- 在 XML 中使用 SpEL 表達式實現(xiàn)屬性注入
對于 XML 配置,Spring 還支持在 bean 定義中使用 SpEL。
首先,需要創(chuàng)建一個 Spring XML 配置文件,我們將其命名為 app-config.xml:
<?xml version="1.0" encoding="UTF-8"?>
< beansxmlns= "http://www.springframework.org/schema/beans"
xmlns:xsi= "http://www.w3.org/2001/XMLSchema-instance"
xmlns:context= "http://www.springframework.org/schema/context"
xsi:schemaLocation= "http://www.springframework.org/schema/beans
http://www.springframework.org/schema/beans/spring-beans.xsd
http://www.springframework.org/schema/context
http://www.springframework.org/schema/context/spring-context.xsd" >
< context:component-scanbase-package= "com.example"/>
< beanid= "azure"class= "com.example.demo.bean.Azure">
< propertyname= "name"value= "#{
'spel-for-azure'}" />
< propertyname= "priority"value= "#{10}"/>
</ bean>
< beanid= "emerald"class= "com.example.demo.bean.Emerald">
< propertyname= "name"value= "#{
'copy of ' + azure.name}" />
< propertyname= "priority"value= "#{azure.priority + 1}"/>
</ bean>
< beanid= "ivory"class= "com.example.demo.bean.Ivory">
< propertyname= "name"value= "#{azure.name.substring(0, 3)}"/>
< propertyname= "priority"value= "#{T(java.lang.Integer).MAX_VALUE}"/>
</ bean>
</ beans>
注意:在 XML 中使用 SpEL 需要使用 #{},而不是 ${}。
然后修改這 3 個 Bean,如果是使用 XML 來配置 Spring 的 Bean 的話,那么在 Java 類中就不需要使用 @Component 注解了。因為 XML 配置文件已經(jīng)明確地告訴 Spring 這些類是 Spring Bean。
同樣的,如果在 XML 文件中定義了 Bean 的屬性值,那么在 Java 類中就不需要使用 @Value 注解來注入這些值了。因為 XML 配置文件已經(jīng)明確地為這些屬性賦了值。
Azure.java
packagecom.example.demo.bean;
publicclassAzure{
privateString name;
privateInteger priority;
publicString getName{
returnname;
}
publicvoidsetName(String name){
this.name = name;
}
publicInteger getPriority{
returnpriority;
}
publicvoidsetPriority(Integer priority){
this.priority = priority;
}
@Override
publicString toString{
return"Azure{"+
"name='"+ name + '''+
", priority="+ priority +
'}';
}
}
Emerald.java
packagecom.example.demo.bean;
publicclassEmerald{
privateString name;
privateInteger priority;
publicString getName{
returnname;
}
publicvoidsetName(String name){
this.name = name;
}
publicInteger getPriority{
returnpriority;
}
publicvoidsetPriority(Integer priority){
this.priority = priority;
}
@Override
publicString toString{
return"Emerald{"+
"name='"+ name + '''+
", priority="+ priority +
'}';
}
}
Ivory.java
packagecom.example.demo.bean;
publicclassIvory{
privateString name;
privateInteger priority;
publicString getName{
returnname;
}
publicvoidsetName(String name){
this.name = name;
}
publicInteger getPriority{
returnpriority;
}
publicvoidsetPriority(Integer priority){
this.priority = priority;
}
@Override
publicString toString{
return"Ivory{"+
"name='"+ name + '''+
", priority="+ priority +
'}';
}
}
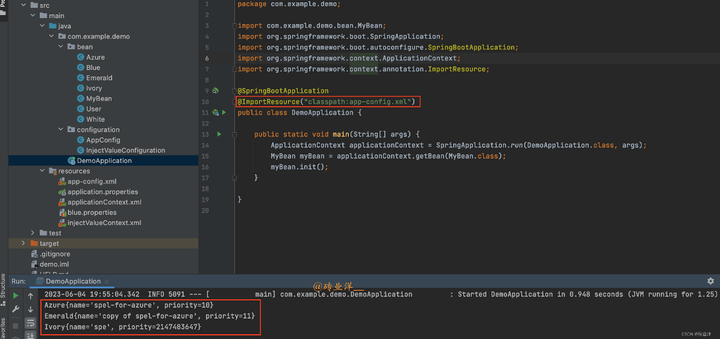
然后需要在主程序中導入這個 XML 配置文件,這可以通過在主程序中添加 @ImportResource 注解實現(xiàn):
packagecom.example.demo;
importcom.example.demo.bean.MyBean;
importorg.springframework.boot.SpringApplication;
importorg.springframework.boot.autoconfigure.SpringBootApplication;
importorg.springframework.context.ApplicationContext;
importorg.springframework.context. annotation.ImportResource;
@SpringBootApplication
@ImportResource( "classpath:app-config.xml")
publicclassDemoApplication{
publicstatic void main(String[] args) {
ApplicationContext applicationContext = SpringApplication.run(DemoApplication . class, args);
MyBean myBean = applicationContext.getBean(MyBean . class);
myBean. init;
}
}
這樣就可以在 Spring 的 XML 配置文件中使用 SpEL 了。
運行結果如下:
END


