
作者 / Caren Chang, Android Engineer
google Play Billing 系列內容是專門為中文開發者開辟的系列分享,著重講解中國開發者對 Play Billing 最容易感到疑惑的地方。如果您有任何問題,也歡迎在留言區提出,我們會收集大家的反饋并在后續文章中做出解答。
銷售數字內容是許多 Android 應用的主要營收渠道。具體形式包括銷售應用內的特定商品 (如游戲金幣) 以及訂閱計劃 (比如允許用戶在限定時間內訪問高級功能)。Google Play Billing 作為一個數字內容銷售的工具和服務的集合,可以幫助開發者在 Android 應用中銷售線上商品。
本文將從基礎知識開始,帶大家逐步深入,詳細了解 Google Play Billing 3,及其用例和最佳實踐。
首先,我們來熟悉一下 Google Play Billing 的一些關鍵組件。
- Google Play 管理中心 (Google Play Console) - Google Play 管理中心既是 Android 應用發布平臺,也可以用于設置應用中銷售的各種內容。在 Play 管理中心可以配置待出售的商品,包括價格點,以及針對每個產品進行高級配置,如提供訂閱的免費試用期;
- Google Play Billing Library - 這是您集成到 Android 應用中的開發庫。使用此庫連接 Google Play 就可以執行各種與銷售相關的任務,例如在用戶購買商品時處理購買流程;
- Google Play Developer API - 一組 REST API,可用于與 Google Play 通信。使用這些 API 可以查詢和管理應用銷售的商品。這些 API 還可以驗證用戶的購買中是否存在欺詐行為,或者檢查訂閱是否仍處于有效狀態。
Google Play 管理中心
https://developer.android.google.cn/distribute/console
Google Play Billing Library
https://developer.android.google.cn/google/play/billing/billing_library_overview
Google Play Developer API
https://developers.google.cn/android-publisher
了解了 Google Play Billing 的關鍵組件之后,我們將從頭介紹如何設置環境并開始在 Android 應用中銷售商品。
1. 設置 Android 應用以使用 Google Play Billing 開發庫
第一步,也是最重要的一步,是設置 Android 應用以使用 Google Play Billing 開發庫。
向 App/build.gradle 文件中添加以下依賴關系,在應用中實現 Google Play Billing:
implementation ‘com.android.billingclient:billing:3.0.0’
添加庫依賴關系后,為應用構建一個發布版 APK,并將其上傳到 Google Play 管理中心。
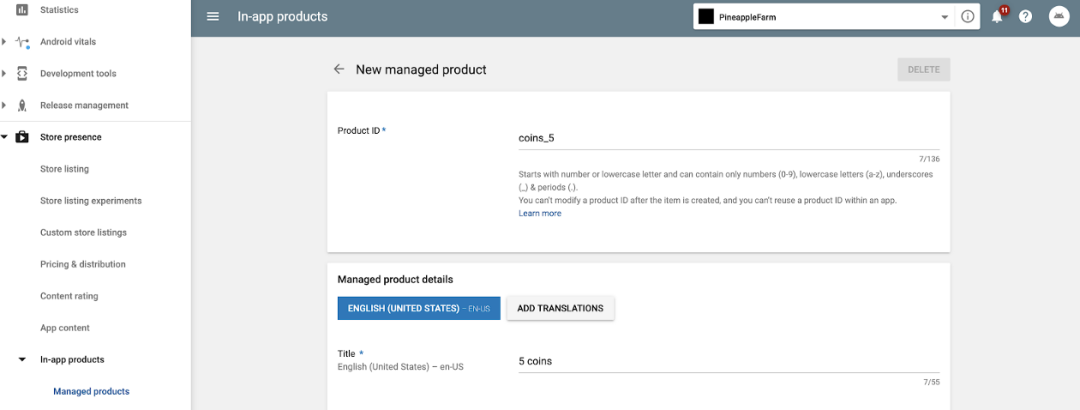
2. 添加應用內產品
上傳 APK 后,可以使用 Google Play 管理中心開始添加要在應用中銷售的應用內產品。在 "商店發布 (Store Presence)" 下,有一個設置應用內產品的部分。在這里可以設置兩種類型的商品:
- 托管產品 (或一次性購買)
- 訂閱
創建新的托管產品和訂閱時,需要輸入商品的產品 ID (Product ID) 或 SKU。這個產品 ID 后續將在應用代碼中使用,我們稍后會講到。在創建托管產品之前,應慎重規劃產品 ID。產品 ID 在應用中必須唯一,并且在創建后無法更改或重復使用。
為了使測試更快、更簡單,您可以將您的 Google 帳號添加到 Google Play 開發者帳號的 "許可測試 (License Testing)" 中。這樣,只要軟件包名稱與 Play Store 中的 APK 匹配,就可以使用調試版本和調試簽名進行測試。
將 Google 帳號添加到 Google Play 開發者帳號的 "許可測試 (License Testing)"  中
https://developer.android.google.cn/google/play/billing/billing_testing#testing-purchases
3. 檢查設置是否成功
在 Play 管理中心中設置好產品后,您可以在應用中查詢產品的詳細信息來檢查設置是否成功。
lateinit private var billingClient: BillingClient
override fun onCreate(savedInstanceState: Bundle?) {
   super.onCreate(savedInstanceState)
   // Set up the billing client
   billingClient = BillingClient
      .newBuilder(this)
      .enablePendingPurchases()
      .setListener(this)
      .build()
   billingClient.startConnection(object : BillingClientStateListener {
      override fun onBillingSetupFinished(billingResult: BillingResult) {
         if (billingResult.responseCode == BillingClient.BillingResponseCode.OK) {
            Log.i(TAG, "Billing client successfully set up")
            queryOneTimeProducts()
         }
      }

      override fun onBillingServiceDisconnected() {
         Log.i(TAG, "Billing service disconnected")
      }
   })
}
private fun queryOneTimeProducts() {
   val skuListToQuery = ArrayList<String>()
   skuListToQuery.add("coins_5")
   // ‘coins_5’ is the product ID that was set in the Play Console.
   // Here is where we can add more product IDs to query for based on
   // what was set up in the Play Console.
   val params = SkuDetailsParams.newBuilder()
   params
      .setSkusList(skuListToQuery)
      .setType(BillingClient.SkuType.INAPP)
   // SkuType.INAPP refers to 'managed products' or one time purchases.
   // To query for subscription products, you would use SkuType.SUBS.
   billingClient.querySkuDetailsAsync(
      params.build(),
      object : SkuDetailsResponseListener {
         override fun onSkuDetailsResponse(
            result: BillingResult?,
            skuDetails: MutableList<SkuDetails>?
         ) {
            Log.i(TAG, "onSkuDetailsResponse ${result?.responseCode}")
            if (skuDetails != null) {
               for (skuDetail in skuDetails) {
                  Log.i(TAG, skuDetail.toString())
               }
            } else {
               Log.i(TAG, "No skus found from query")
            }
         }
      })
}
如果一切順利,您將會看到剛剛添加進 Play 管理中心的產品的詳細信息!
4. 接入 Google Play Billing 開發庫
下一步,便是如何在您的 Android 應用中接入 Google Play Billing 開發庫。
本文將以一次性購買的生命周期為例,即在應用中銷售數字商品及授予用戶的過程。如果您在應用中提供了訂閱功能,您也可以閱讀往期文章《訂閱取消后的那些事兒——恢復訂閱和重新訂閱》了解更復雜生命周期的訂閱流程。
一次性產品可以是消耗品,也可以是非消耗品。消耗品意味著用戶可以再次購買。例如,如果您的游戲允許用戶購買金幣,您可以將金幣做成消耗品,讓用戶可以多次購買。非消耗品意味著用戶只能購買一次,典型示例是包含額外應用內功能的升級包。
在 Google Play 管理中心配置應用內產品后,其銷售過程如下:
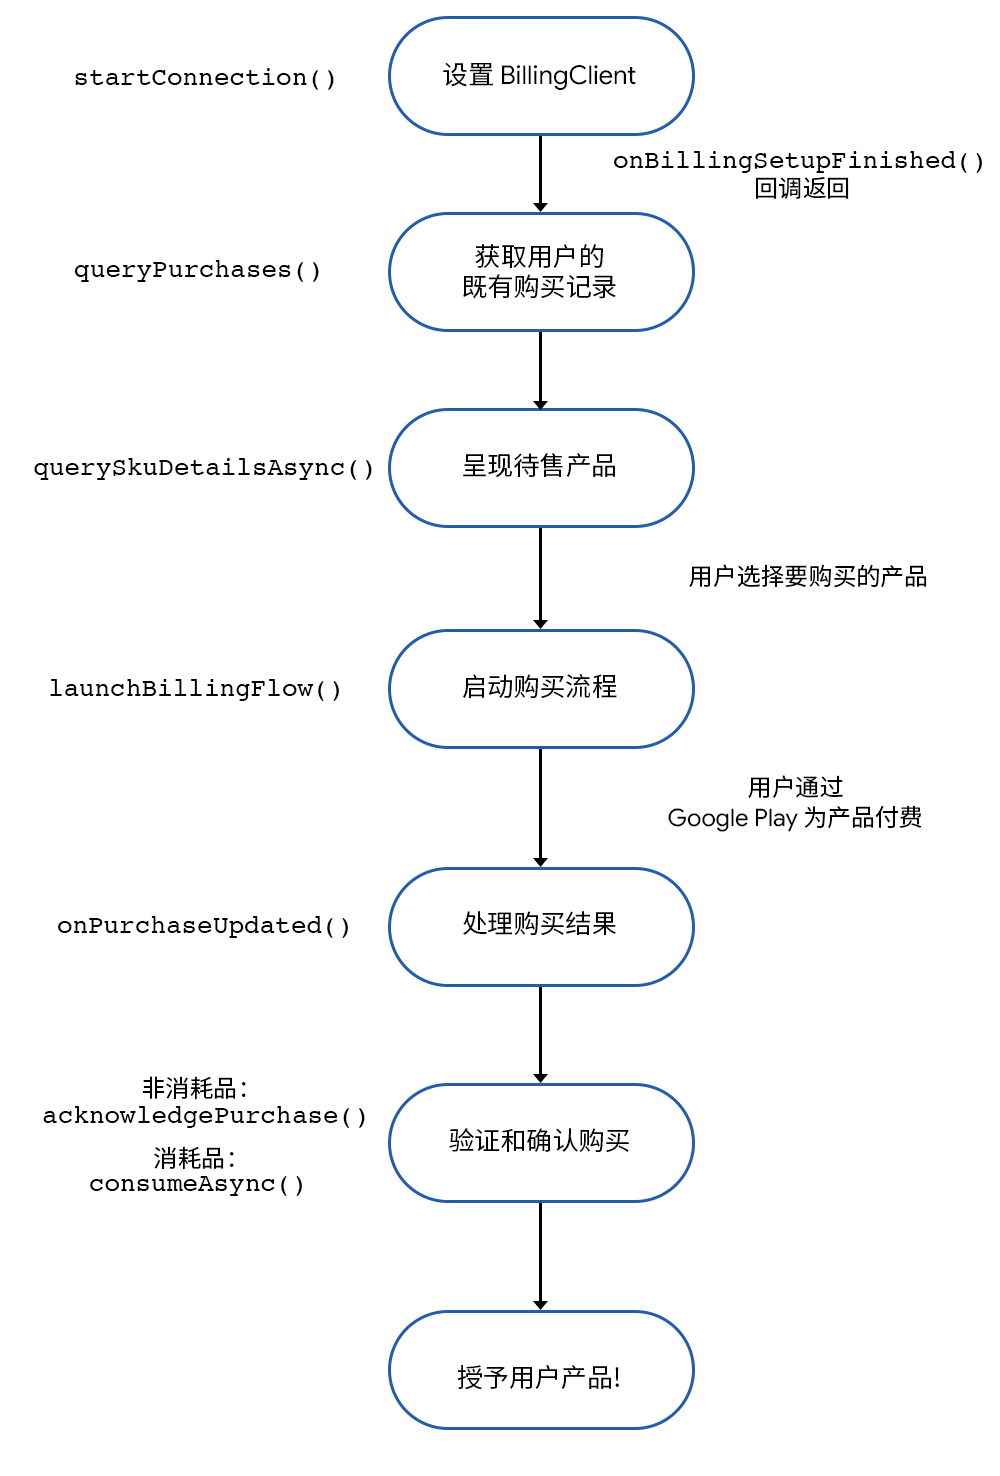
讓我們逐步分析這一過程。
1. 設置 BillingClient - BillingClient 類讓您的應用可以與 Play Billing Library 進行通信。您的應用需要做的第一件事是調用 startConnection() 與 Google Play 建立連接。
startConnection()
https://developer.android.google.cn/reference/com/android/billingclient/api/BillingClient#startconnection
在實際環境中連接是有可能中斷的,所以您的應用還必須重寫 onBillingServiceDisconnected() 回調來處理重新連接,確保應用在發出任何進一步請求之前已與 Google Play 連接。
onBillingServiceDisconnected()
https://developer.android.google.cn/reference/com/android/billingclient/api/BillingClientStateListener#onBillingServiceDisconnected()
onBillingServiceDisconnected()
https://developer.android.google.cn/reference/com/android/billingclient/api/BillingClientStateListener#onBillingServiceDisconnected()
2. 獲取用戶的既有購買記錄 - 成功設置 BillingClient 后,您的應用現在可以調用queryPurchases() 來查詢用戶先前的購買記錄。
/**
 * Query Google Play Billing for existing purchases.
 *
 * New purchases will be provided to PurchasesUpdatedListener.
 */
fun queryPurchases() {
    if (!billingClient.isReady) {
        Log.e(TAG, "queryPurchases: BillingClient is not ready")
    }    // Query for existing in app products that have been purchased. This does NOT include subscriptions.
    val result = billingClient.queryPurchases(BillingClient.SkuType.INAPP)
    if (result.purchasesList == null) {
        Log.i(TAG, "No existing in app purchases found.")
    } else {
        Log.i(TAG, "Existing purchases: ${result.purchasesList}")
    }
}
3. 呈現待售產品 - 在本文的前半部分我們談到了如何在 Google Play 管理中心中設置產品以及如何在應用中查詢這些產品。在調用 querySkuDetailsAsync() 獲取每個產品的 SkuDetails 后,即可使用這些信息設置對應的界面。
private fun queryOneTimeProducts() {
    val skuListToQuery = ArrayList<String>()
    // sku refers to the product ID that was set in the Play Console
    skuListToQuery.add("small_pineapple_seed")
    val params = SkuDetailsParams.newBuilder()
    params
        .setSkusList(skuListToQuery)
        .setType(BillingClient.SkuType.INAPP)
    // SkuType.INAPP refers to 'managed products' or one time purchases
    // To query for subscription products, you would use SkuType.SUBS
    billingClient.querySkuDetailsAsync(
        params.build(),
        object : SkuDetailsResponseListener {
            override fun onSkuDetailsResponse(
                result: BillingResult,
                skuDetails: MutableList<SkuDetails>?
            ) {
                if (skuDetails != null) {
                    // Store sku and skuDetail to be used later
                } else {
                    Log.i(TAG, "No sku found from query")
                }
            }
        })
}
querySkuDetailsAsync()
https://developer.android.google.cn/reference/com/android/billingclient/api/BillingClient#queryskudetailsasync
SkuDetails
https://developer.android.google.cn/reference/com/android/billingclient/api/SkuDetails
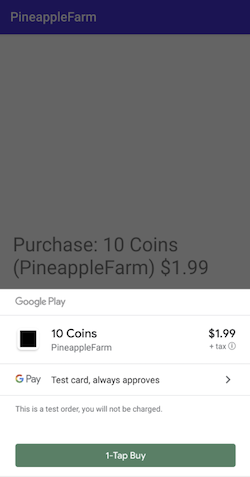
4. 啟動購買流程 - 當用戶點擊產品進行購買時,您的應用需要帶上產品 SkuDetails 來調用launchBillingFlow(),從而向用戶展示 Google Play 購買界面 (如下圖所示)。
fun launchPurchaseFlow(skuDetails: SkuDetails) {
    val flowParams = BillingFlowParams.newBuilder()
        .setSkuDetails(skuDetails)        .build()    val responseCode = billingClient.launchBillingFlow(this, flowParams)
    Log.i(TAG, "launchPurchaseFlow result ${responseCode}")
}
launchBillingFlow()
https://developer.android.google.cn/reference/com/android/billingclient/api/BillingClient#launchbillingflow
5. 處理購買結果 - 在用戶退出 Google Play 購買界面時 (點擊 "購買" 按鈕完成購買,或者點擊 "返回" 按鈕取消購買),onPurchaseUpdated() 回調會將購買流程的結果發送回您的應用。然后,根據 BillingResult.responseCode 即可確定用戶是否成功購買產品。如果 responseCode == OK,則表示購買已成功完成。
- onPurchaseUpdated()
https://developer.android.google.cn/reference/com/android/billingclient/api/PurchasesUpdatedListener#onPurchasesUpdated(com.android.billingclient.api.BillingResult,%20JAVA.util.List%3Ccom.android.billingclient.api.Purchase%3E)
- BillingResult.responseCode
https://developer.android.google.cn/reference/com/android/billingclient/api/BillingClient.BillingResponseCode
onPurchaseUpdated() 會傳回一個 Purchase 對象列表,其中包括用戶通過應用進行的所有購買。每個 Purchase 對象都包含 sku、purchaseToken 和 isAcknowledged 以及其他很多字段。使用這些字段,您可以確定每個 Purchase 對象是需要處理的新購買還是不需要進一步處理的既有購買。
// Google Play calls this method to propogate the result of the purchase flow
override fun onPurchasesUpdated(billingResult: BillingResult, purchases: List<Purchase?>?) {    if (billingResult.responseCode == OK && purchases != null) {
        for (purchase in purchases) {
            handlePurchase(purchase)        }    } else if (billingResult.responseCode == USER_CANCELED) {
        Log.i(TAG, "User cancelled purchase flow.")
    } else {
        Log.i(TAG, "onPurchaseUpdated error: ${billingResult?.responseCode}")
    }}
- Purchase
https://developer.android.google.cn/reference/com/android/billingclient/api/Purchase
6. 驗證和確認購買 - 使用 Play Billing Library 3.0 時,您的應用需要確認購買成功才能完成購買流程。如果您的應用未在 72 小時內確認購買,則用戶會自動收到退款,并且 Google Play 會撤消該購買交易。
如果您的應用包含驗證服務器組件,您應在驗證成功后再確認購買。我們強烈推薦開發者對所有的應用內購買進行驗證。請查看本指南了解有關打擊欺詐性購買的更多信息。
指南: 打擊欺詐和濫用行為
https://developer.android.google.cn/google/play/billing/security#verify
在對購買進行驗證之后,您還需要對其進行確認。
- 非消耗品必須通過調用 acknowledgePurchase() 進行確認;
- 消耗品必須通過調用 consumeAsync() 來標記為 "已消耗 (consumed)",使得用戶可以再次購買。調用 consumeAsync() 還會將購買設置為已確認,因此只要調用了consumeAsync(),就無需再對消耗品調用 acknowledgePurchase()。
fun handlePurchase(purchase: Purchase) {
    // If your app has a server component, first verify the purchase by checking that the
    // purchaseToken hasn't already been used.
    // If purchase was a consumable product (a product you want the user to be able to buy again)
    handleConsumableProduct(purchase)
    // If purchase was non-consumable product
    handleNonConsumableProduct(purchase)
}
fun handleConsumableProduct(purchase: Purchase) {
    val consumeParams =
        ConsumeParams.newBuilder()
            .setPurchaseToken(purchase.getPurchaseToken())
            .build()
    billingClient.consumeAsync(consumeParams, { billingResult, purchaseToken ->
        if (billingResult.responseCode == BillingResponse.OK) {
            // Handle the success of the consume operation.
        }
    })
}
fun handleNonConsumableProduct(purchase: Purchase) {
    if (purchase.purchaseState == PURCHASED) {
        if (!purchase.isAcknowledged) {
            val acknowledgePurchaseParams = AcknowledgePurchaseParams.newBuilder()
                .setPurchaseToken(purchase.purchaseToken)
            billingClient.acknowledgePurchase(acknowledgePurchaseParams.build())
        }
    }
}
acknowledgePurchase()
https://developer.android.google.cn/reference/com/android/billingclient/api/BillingClient#acknowledgepurchase
consumeAsync()
https://developer.android.google.cn/reference/com/android/billingclient/api/BillingClient#consumeasync
7. 授予用戶產品 - 完成上述步驟后,您的應用就可以向用戶授予他們購買的應用內產品了!
如果您想查看 Google Play Billing 開發庫的資源,可以在此處訪問官方文檔。我們還提供了一些示例,演示了實現 Billing 庫的最佳實踐。本文中的代碼示例可以在 GitHub 上獲取。
官方文檔: Google Play Billing 服務概覽https://developer.android.google.cn/google/play/billing/billing_overview
Play Billing 開發庫示例
https://github.com/android/play-billing-samples
本文中的代碼示例
http://github.com/calren
如果您的應用目前尚未使用 Play Billing Library 3,務必查看我們的遷移指南,將您的應用遷移到最新的 Play Billing Library。
從 AIDL 遷移到 Google Play Billing 開發庫的遷移指南
https://developer.android.google.cn/google/play/billing/migrate

文章轉載自:谷歌開發者公眾號原創文章


